Today it is a snowy snowy day, on the first day of Spring no less! Crazy Missouri weather. I do love snow, even on the first day of Spring. I know, I know, I hear the boo's through my computer, I'll leave that alone for now.
Since it was obviously an "inside" kinda day I have been working on my next project due to The Scrapbook Page. My assignment was to make a one page layout for Graduation and a card.

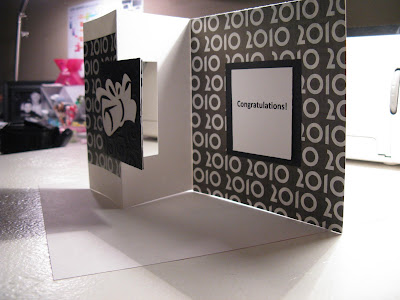
This is a really fun card to create. I will put the directions on how to make this card at the bottom of my post. I have taken several pictures of this card so you can see how it's made. 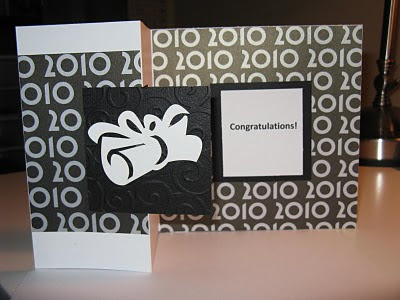


The paper is metallic so I apologize for the quality of the pictures as it is difficult to get a good shot. The paper I used was by a company called Reminise and can be found at The Scrapbook Page. You can visit their website by clicking on the link on the left side of my page.
Below is the layout I did, also using paper by Reminise. The wording at the bottom was cut off of another piece of cardstock which can be found at The Scrapbook Page called Creative Imaginations. I embelished the edges of it with silver Stickles.

Well that's it for now. I am working on a Spring Page and will be posting it tomorrow. Maybe I should add a litte snow to that page for kicks and giggles. Just kidding. I don't think that would fly.
Directions for the card are below.
1) Cut white cardstock in a 12x6 in piece. 2) Score down the middle of the long side creating a 6x6 in card. 3)Open the card so you are working on the inside portion of the the front page of the card. Using a pencil and a ruler mark the card 1 1/2 inches in from the edge on all sides. Use a light hand so your pencil marks aren't too dark. This should create a 3x3 inch square in the middle of your page. 4) Next you'll need to score this front flap in half again, making sure not to score through the middle of the square you've created. 5)After you've scored carefully fold that front portion backwards leaving the square portion flat.
If you have any questions feel free to post at the bottom and I will be glad to email you back.


Very cool JJ! These turned out great! I love the card. I'm going to have to try my hand at this style of card!
ReplyDelete