Dec 13, 2012

Christmas Gift Tags Using Repurposed Business Cards

Well it is that time of year when things start to get REALLY crazy!  Shopping, wrapping, cooking, baking and then when you mix in all of the party events............. well ya know! I recently lost my job due to a company merger.  This has given me a "little" bit more time AND a  WHOLE box of business cards that will NOT be used. LOL!     I was trying to find some way to use these. I really try hard to repurpose items when I can. I decided to use some for gift tags.


 I made some with pictures and some with names. I have included  several examples but the sky is the limit. I was in a time crunch to get mine done but I think you could really get creative. I may try out some other ideas when things calm down a bit.

I used two business cards for each gift tag.  I glued the fronts of the cards together giving me blank sides on the front and back of the tag.  For the picture tags I printed them out on regular printer paper and  applied them to the tag using a thin layer of Mod Podge. Once dry I applied another coat to cover the photo and give it a finished look.  When the tag is completely dry I punched a hole in the top of the tag and used an eyelet to give it a finished look.  I think they turned out really great.  I put their name on the back too.  I also used some distress ink on some of these to give them an aged look.
On the name tags I just printed their name out using my printer in a size that would fit on the tag.  I then attached to the tag using a thin layer of Mod Podge. I set these under my craft light for quicker drying time.  I embellished the names using a variety of things but I thought the Liquid Pearls by Ranger did well.  Once the Liquid Pearls was dry I applied another thin layer of Mod Podge over the top and then allowed it to dry once again.


 Hope you give this a shot some time.  If you do please share your ideas!  Happy wrapping!

Dec 2, 2012

So many things to do and so little time!

Well this is that crazy time of year where the lists seems get longer and the days get shorter.  How in the world do we get it all done before Christmas?  I ask myself this same question every year but it always seems to come out in the end so I try not to let it stress me out too much.  This year I am actually ALMOST done with my shopping.  MOST of the decorating has been done.... now if I could just squeeze some time in for baking!!

On a side note I made this birthday card below for my son. He loves his dogs so much.  I thought he would appreciate this card.  This little rascal is adorable. This is a digi stamp by Karens Doodles.  She has adorable images.  I've had this stamp a long time and I actually believe it was a freebie so you can't beat that!  You can find her images HERE .

This was a really cute image to color and it works well for a "guy" card too.

Well that's it for me today. Short and sweet.

Hope you have a fantastic day!
Jerri

Nov 29, 2012

Best Recipe for Banana Nut Bread

Mmmmm the smell of banana nut bread baking in the oven is so warm and inviting.
  I love to bake on cold days and this past Monday was cold and blustery for sure.  I even saw a few snow flakes!  
We didn't get any snow last year so I DID enjoy watching the flakes fall.  I decided it would be a great day to make banana bread.  People ask me all of the time for the recipe so I thought I would share it on my blog. The snow flakes didn't stick around very long and neither did the banana bread haha!


I will give you the recipe  below but just a couple of side notes.

1)  When I have bananas that get too ripe before we can eat them, I pop them in the freezer.  When you're ready to bake you can remove them and just let them thaw in a bowl for a bit.  After they thaw, remove the peel.  Hold them over the bowl when you do this because they will be slimy and will slide right out of the peeling. Mash them up a bit with a potato masher or a fork.

2)The recipe calls for butter.  You need to use the real stuff.
3) I make this a few different ways....  You can use the whole batch in one bundt pan. Sometimes I split the batter in half and put them in loaf pans, like I did today.  When I split it I can put one in the freezer and it also allows me to mix it up a bit. For example today I made one with nuts and one with chocolate chips YUM!  Or you could do one with nuts and one without. 


If you try this recipe let me know what you think.  If you tweak it or have any other great ideas let me know. I would love to hear.

Jerri's Banana Bread
1 1/2 sticks of unsalted butter, at room temperature
1 cup sugar
2 eggs
1 1/2 cup unbleached all purpose flour
1 teaspoon baking soda
1 teaspoon salt
1 cup mashed ripe bananas, or previously frozen using method above (I usually use 3 or 4)
1/2 cup sour cream
1 teaspoon vanilla extract
1/2 cup chopped walnuts if desired

Preheat oven to 350 degrees. spray bundt pan or loaf pans with non-stick cooking spray. With mixer, cream butter and sugar until light and fluffy. Add the eggs, beating well.
In a separate bowl combine the dry ingredients and mix together with a whisk to combine.  Add the dry ingredients to butter mixture, gradually.
Add bananas, sour cream and vanilla, combine well. Stir in nuts if desired and pour batter into prepared baking dish.
Place in preheated oven and bake until cake tester comes out clean. This will take approximately an hour for a bundt pan but less for loaf pans.
Serve with butter or a sprinkle of powdered sugar if desired.

Enjoy!


Oct 31, 2012

Happy Halloween

Another Halloween has come and gone.  What a beautiful night.  A little chilly but not too bad.  A big spooky moon in the sky and no rain, which is a blessing.  We went to our daughters and walked around with the kids.  It was a great time.

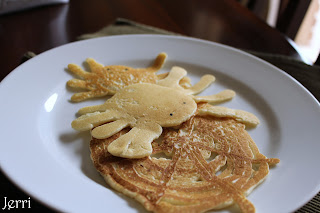
Yesterday I made some spooky spider pancakes.  The kids were NOT impressed. Ha ha. I guess I will have to try another route next year. Ok......I know they look a little more like crabs than spiders but hey, I tried.


So here is a Halloween card I made.  I don't know what happened to this picture but you can get the idea. I I tried twice to load it.  User error I am sure! This was a wooden stamp I bought at Archivers by Northwoods Rubber Stamps, Inc.  It is all one stamp so I Stamped it twice. I cut out the frame from the second image I stamped and then cut the frame out so I could use pop dots and raise it above the first image.  I glittered the ghosts and also used some purple ink to shade around the ghosts.  It was very easy and so cute. 


Here are a few pics from this evening.   The picture below of myself, my husband and my grandson the ape and my grand daughter the Monster High girl (I'm still not sure what that is) lol!

My Sister-In-Law with my grandson during the trick-or-treat parade. 


                        My grand daughter as the cutest little chef I have ever seen.  She could get her own cooking show looking so cute!  She even has a little flour on her.
 I hope everyone had a safe an happy Halloween.  Next up................


Thanksgiving!!! I got a cute Thanksgiving stamp today woot woot!

Jerri


Oct 29, 2012

Halloween Treat Bags

Halloween is almost here!
Fall is my favorite time of year and I do love Halloween.  I love everything about it.  The crisp cool air that we get this time of year, the smell of pumpkin, candy, costumes, and all of the little trick-or-treaters.   I made treat bags for the grandkids using some inspiration from a couple of areas on the web. These were made an average brown paper bag and a few embellishments which I have elaborated on below.

 For the mummy I simply cut strips of white copy paper and glued them across the front of the bag.  I folded the top of the bag over and stapled with one small staple ( I used my Tim Holz staple gun). I glued googly eyes over the staple to hide it and then glued two additional strips across the top of the bag which cover just the tip top of his eyes to appear that he is peeking through.

For the witch bag, I cut out the witch shoes on my Cricut machine using the Happy Hauntings cartridge.  I then just cut out (freehand) the stockings and skirt from some paper I had in a paper stack by s.e.i called eerie alley.  I embellished with some hemming lace and a button was used to cover up the staple that holds the flap down.

I think you could really get fancy with these bags if you so choose but as for me, I didn't want to spend all day on them because I know the kiddos are just going to rip into them for the goodies.  Hope this inspires you to do something crafty today.


Jerri


Apr 17, 2012

There is no such thing as TOO MUCH work space

My craft room is small.  I have visions of a really cool room that looks like a designer decorated it.  However, I have come to the conclusion that what I REALLY need is lots and lots of work space. The more tables I add, the more I need.  This begs the question...Can a crafty girl EVER have TOO MUCH work space???


This room is still work in progress but I have found plenty of places for storage. My biggest challenge seems to be finding a way to fit more desk space for working.  I really like to spread my papers and things out.  By the time I get all my stuff scattered about, I have to find room for my Cuttle Bug, my sewing machine, my Cricut and so on.  Now I know I'm not the only one with this sickness so if you have any ideas I'd love to hear from you. 

 I don't have it pictured but in the other corner of the room I have a TV mounted on the wall.  I think I am going to add another table in that corner as well, just under the TV.  I would like to find an old wooden table at a flea market and paint it white.  I can use it as desk space for my computer and printer and of course extra space for cutting or sewing when I am working on a project . If I ever get it figured out I'll let you know.   

Well despite my challenges I was able to find enough room to make the card below.  Ha ha.  This is a card that that can be whipped together in no time. I used a wooden stamp by Savvy Stamps that I purchased from Archivers.  I stamped the image on white cardstock and embossed it in black. I then cut the image out with my Spellbinders.  I used the same Spellbinders design and cut out the next larger size (same shape) out of my patterned paper.  I used my Pop Dots as you can see below.  I then used some black ribbon to tie the card shut. 

Although I LOVE to use my Copic markers I think it is always nice to make a simple yet elegant card.

Hope you have a fantastic day!


Mar 12, 2012

Paper Piecing

So...  my mind was set.  I decided that starting today I would get back on track.  I would begin posting on my blog, eating right, and get back into my running routine after a long winter off.  Welllll.  I've been sick for 5 days now.  I haven'tbeen eating right, I didn't start running today either.  In my defense I really felt like dog pooh on a platter.  Plus the time change made it feel like 4:00am instead of 5:00am.  I guess it's a small price to pay for an extra hour of sunshine.

I am however getting in a blog post!  That's better.  Now I don't feel like such a loser. So although this post will be short (did I mention I don't feel well?)  ha ha I'm such a baby, I will at least have gotten it out there.  I found a picture of a card that I actually did last summer.  It was a digi stamp of a cupcake.   I printed the digi first on my cardstock and then a second time on the patterned paper I wanted the cupcake wrapper to look like. 

once I had the images printed I then cut out the image on the patterned paper. You only need to cut out the part that you want to use , in this case it was the cupcake liner.  Once cut out, this can be placed over the cupcake liner on the cardstock.  You can then finish the rest of the image however you wish. I glittered the "icing" on the cupcake. I also used my glaze pen to add a little bit of sheen to the cherry on top.  I thought it came out pretty cute.
I placed my finished cupcake image on a piece of cardstock that was embossed with my cuttlebug.  Then I cut out another patterned paper with my spellbinder die and placed it on top with some pop dots to give it a 3 dimensional look. 

Well I hope you try paper piecing and see how fun and easy it is.  I have a busy week ahead but hope to get another post in later this week.  Enjoy that extra hour of sunshine!