Dec 24, 2013

Zigzag Afghan

So I finally finished my Zigzag Afghan and wanted to share it with you.

This was my first attempt and it was so easy. I crocheted this blanket however there are TONS of patterns on the web for crocheting and knitting.  I would suggest you look around because there are some really great plays with patterns and colors.  I knew I didn't want to use expensive yarn as this was my first attempt and also because I wanted something we could use a lot and wash often without having to dry clean.  I just used cheap yarn purchased at Wal-Mart.  This somewhat limited me to the colors I could use.
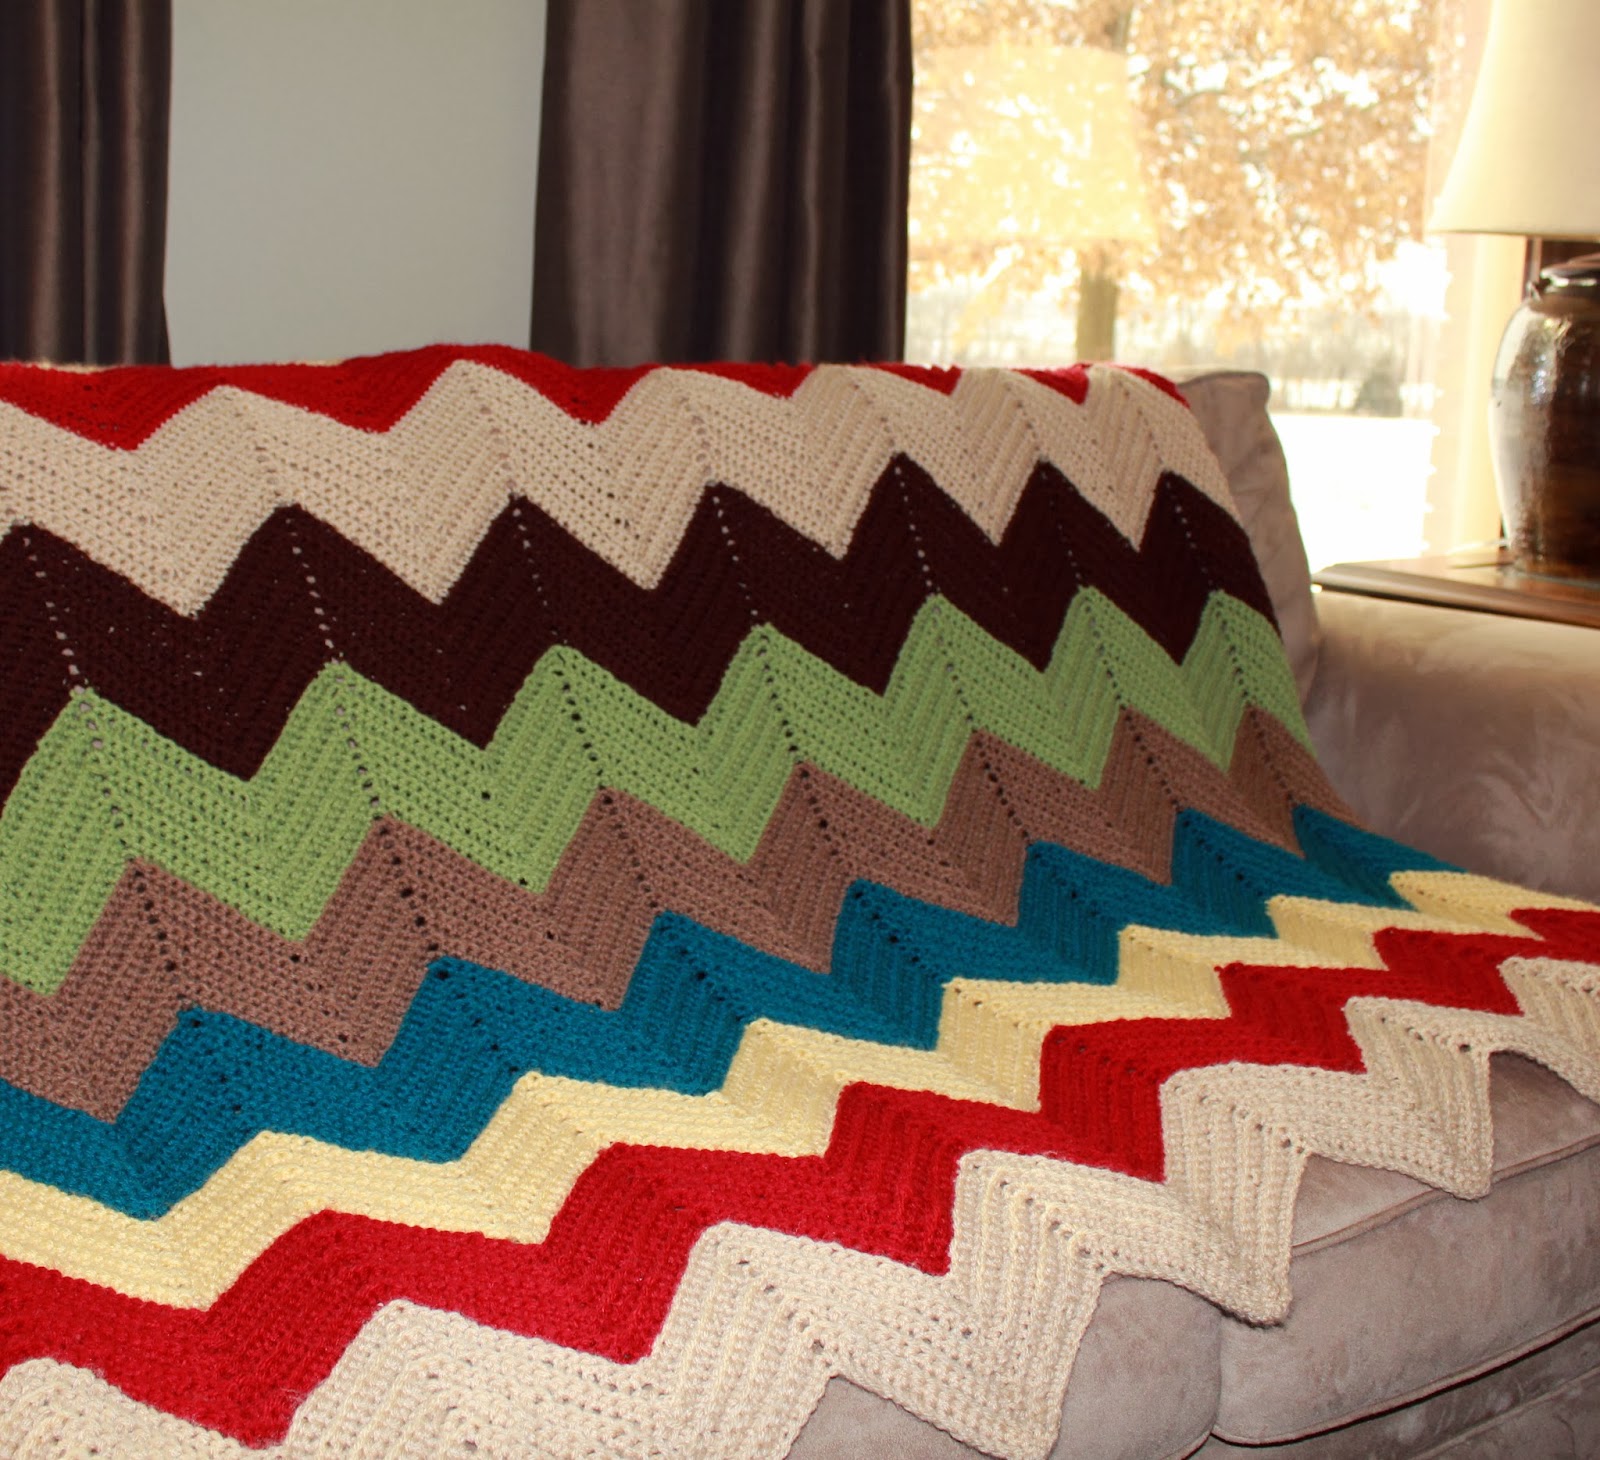
As I said, there are tons of free patterns out there but I can give you a quick description of how I made this one. The dimensions of mine are roughly 57" x 68". This will vary based on your crochet style and the number of rows you decide to make.
Hook size used for mine - I

Row 1 Chain  243

Row 2 SC in 2nd stitch from hook, * SC in each of the next 14 chains, 3 SC in next chain, SC in each of the next 14 chains, Skip 1 chain, repeat from * across ending with the skip one stitch, SC in last stitch, chain 1, turn your work over.

Row 3 work in the back loop of your stitches--SC in the first SC, Skip one SC,  * SC in each of the next 14 SC's, 3 SC's in the next SC, SC in each of the next 14 SC's, Skip 2 stitches, repeat from * across ending last repeat with skip one SC, SC in last stitch, chain 1, turn your work over.

Repeat Row 3 throughout, working 8 more rows in this color for a total of 10 before switching to a new color. Do this until you reach the desired length.
If you have any questions let me know.


Have a great Day!


Dec 18, 2013

Christmas in a Jar- Homemade Snow Globes

Just a last minute easy-to-do decorating idea for Christmas.
I had found some small Christmas tree's at Wal-mart, in the section with the small Christmas Village displays.  I think they were around $2.00 I purchased them and had the idea of making snow globes.
I glued the little tree inside of the jar lid using a waterproof adhesive.   At this point if you wanted to make the snow globe you could add some distilled water with a few drops of glycerin (not too much). Add some glitter and then make sure you place the lid on tight. Voila! you have a snow globe. I liked the way mine looked without the water so I decided to just keep mine as is.  

This would also make a great kid craft if you could find the right things to place inside.  Keep an eye out for any kind of ornament or small figurine that is waterproof.  Have fun!

Have a great day!


Dec 17, 2013

A Cupcake Thief!

I hope you are ready for Christmas because it's right around the corner. I have 3 more gifts to buy then I'm done.  I know what I need to pick up so it will be easy.  I think the biggest challenge for me is figuring out WHAT to buy.  I would stand in line and fight the crowds if I knew what I was fighting for!  I think I'll set myself a reminder to start getting some Christmas ideas for people in June LOL!  Hey I probably shouldn't laugh about that. I would probably need 6 months just to get my list together. 
I did a lot of shopping online this year.  What a time saver.  I spent an entire day at my computer BUT ---- I didn't have to fight the lines, I didn't have to waste gas AND most of my items were shipped for free.  LOVE IT.
I wanted to make a birthday card so I used another Mo's Digital image.  I think this little thief is adorable. 
I will be entering this card into the Mo's Challenge #213 - They always have so many great entry's. It's always a good shot of inspiration if you need it. If you want to head over there and take a peak, you can get to their website HERE.

I don't really remember all of the colors I used on this image but I can give you a good idea.
DRESS- YG21, YG23, YG 25
WINGS- BG70, BG72
HAIR- I am not positive but I think I used, E43, E47, E49
PURPLE CUPCAKE LINER- V12, V15, V17
YELLOW- Y13, Y15
I got the string of pearls in the ribbons section at Walmart and the background paper is Recollections Cupcake.

Have a great day!

Dec 5, 2013

Delicious Chicken Tostada Recipe

I tried a new recipe last night that was absolutely delicious. I love a recipe that is easy, quick and delicious. 

The recipe in the link calls for rotisserie chicken.  I had a couple of chicken breasts so I used those instead.  I poached them in a little bit of chicken broth. When the chicken was done I shredded the meat and prepared it as the recipe directed. I used the remainder of the poaching liquid as the broth required in the recipe.  We don't like really spicy food so I also halved the red pepper and the jalapeno. You can find the recipe HERE.  I hope you try this recipe and let me know what you think.


Nov 25, 2013

Christmas Fairy Card

Today I am posting a card that will be entered into the  A Day for Daisies  challenge #83, "Add Some Gold".  Obviously the challenge was to use gold. 

I really wanted to turn the fairy image into a Christmas card so I paper pieced her wings and dress using the the ONLY gold shiny paper I could find.  I must have a zillion sheets of paper but why is it that I never have the one I need??  Woe is me......  The problems of a crafter. LOL!

I used the fairy image provided by A Day for Daisies ( isn't she sweet).  I colored her skin, hair, flowers and tights with my Copics. I printed the image twice more on my gold paper.  I had to print it twice because I wanted to give her wings a 3 dimensional look.  I cut the wings out of the gold twice. I glued the first set of wings on the image itself and then the second set was "pop dotted" ( that is proper grammar in my world) above the first set.  I took this picture at an angle so you can hopefully see what I mean.  Then I cut the dress out in gold and glued it onto the image.  The branch and star were part of a clear stamp set from Hero Arts.  I used my gold metallic chalk to color in the star and the radiant light around it. I could have used my copics for this but I just couldn't seem to get the color right so that it matched her dress.   I embossed the branch with gold embossing powder and then colored it in with my distress marker and then put some little red berry dots around the branch. The Twinkle stamp is another Hero Arts stamp but it is from a wooden set that I have had forever. 
This was a really simple card and I thought she turned out super cute. 

Have a great day!

Nov 24, 2013

Here's a Christmas Tag that will NOT be thrown out with the trash.

Tonight I am posting a photo of a Christmas tag I made using another Mo's Digital Pencil image. 


This image is called Carolers Three .  I colored it with my Copics and used a distress tool around the edge of the image and used some ink on the page to make it look aged.  I thought the satin ribbon looked vintage as well and added a nice touch.

This image is being entered into the Mo's Digital challenge #211, "Anything but a card challenge".


Have a great day!


Nov 23, 2013

A Christmas Card Made With Love and Copic Markers

So this week I tried my hand and creating a Copic video.  I am not a professional but I do LOVE to color with my markers so I decided to give it a shot.  While it  isn't perfect, I thought it turned out pretty good. So here is the card and I have also linked the video below.
It's another easel card.  I used a Tim Holtz tree branch stamp. I  stamped it up the side of my card over and over again at various angles to resemble a tree. I stamped it on both the front of my card and the inside so that when it is standing in the "easel" position it resembles one big tree.  I stamped it using Distress Ink in "Peeled Paint" for the branches.  As for the digi stamp.... I have had this digital image for a while now. It is from one of my favorite sites...   Mo's Digital Pencil.   I have always loved this stamp so I thought I would make a few cards with it this holiday season. 

Here is a closeup of the image.


You can't really see it in the photo but I painted on a little bit of Glimmer on the white background to resemble snow around the images.  It gave it just enough sparkle without going overboard.  I also used my gold Spica Pen to draw in some sparkle on the tree branches.  And I used some Stickles to make a few subtle sparkle dots on the tree as well.  

I also worked on a video while making this card.  I am obsessed with You tube video's.  I could watch them all day long, especially those pertaining to art, drawing etc.  Unfortunately we live in the country and my data plan doesn't allow me to partake in that kind of "time wasting" activity.... So I find other ways to waste my time ha ha. 

ere is my video.  I hope you enjoy it. I loved doing it and plan on making more in the future.  If for some reason you aren't able to get the link here on my blog you can go to my channel on You tube and check it out there. Tell me what you think.  


Well that's it for now.  I am on my way to the store to purchase a bird for the big day.  Wish me luck I bet its a real jungle out there!


Have a great day


Nov 17, 2013

A Card Using the Quilling Technique

I ran across this picture of a card I made a while back. This is a digital stamp from Wee Stamps .  It is an image called Peggy

I noticed that I had quilled some items and placed them on the card.  I had actually forgotten about having the quilling stuff until about a week ago.  Hmmm maybe that is a sign I have too much stuff..... NAH!! LOL. Quilling is a lot of fun so I will have to pull that stuff out again for sure.

Well I'll keep it short and sweet for now.  I need to get started on my Christmas Cards. Wish me luck. Have a great day.

Nov 16, 2013

A Sassy Cheryl Birthday Card

Today I thought I would share a card I made using a digital stamp image from Sassy Cheryl called Polly's Slice of Cake.  

 I colored the image with the Copic markers shown above.  I decided to make this into an easel card.  You can't really tell in the picture but I used some of my Spica glitter pen to put some bling on the candle and I used my glaze pen to add a sheen to the frosting on the cake.  I also decided to put some flags  down on the message part of the card.  I used a clear stamp set from Hero Arts. I stamped them, colored them and cut them out then strung the flags on a piece of craft floss. I thought this card turned out super cute.  Directions on how to make an easel card can be found HERE .  I use the easel card a lot. If you look back through my old posts you can see the ones I have done.
 
  On 11/6 I posted a fall card and also indicated that I had entered it into a contest on the Ribbon Carousel blog.  My Card was chosen as the:


What a compliment. I was so excited! If you didn't see the card click on my blog name above and it will take you to my full blog site.  You can also visit the Ribbon Carousel blog by clicking HERE.  She is having a card contest and there is still time to enter if you are interested.  If you have not interest in joining the contest it is still a great site for inspiration.


Nov 9, 2013

Upcycled Photo Plaque

I was looking through some things and came across a little project I did a while back that I thought I would share. 
We had our home on a Christmas home tour and I was working on a wall that I wanted to put some "Winter" pictures on. 

These wooden plaques were found in a thrift store. They had something printed on them. They were ugly and outdated. I painted over the plaques with acrylic paint and let it dry. I printed the pictures and placed them on the plaques.  I used Mod Podge and put a light coat over the top and let it dry. I used the matte type of Mod Podge because I was afraid the glossy would create too much glare.   I thought they came out really cute.  At the time I used brown ribbon to hang the plaques but you could also use burlap or even rope.  I got lots of compliments on the wall hangings and it cost me almost nothing to do. 

Nov 8, 2013

Thanksgiving Decor

Today I thought I would just post a few pictures of some things I have worked on around the house to get ready for Thanksgiving.  I love fall and the rich colors.

Here is a picture of my front entry and a close-up of the wreath I made last year using supplies from Hobby Lobby.

I have also been working on my mantel.  I struggle with decorating it because I have an arch pattern in the bricks which limits me on the height of things I can put on it.  If anyone has a suggestion I am ALL EARS.  I did get out my paint and paint some of my picture frames to brighten them up.  The one I have shown below was painted blue and then I used some metallic paint to highlight it with.  Here are the before and after shots. I know it needs something else but WHAT????  I am not quite sure what at this point.   I am shopping this weekend so who knows I may find something and re-do it completely. I can't decide if I like the pumpkins either.  I struggle with decorating lets face it haha.

We took our Grand Daughter Emma and I went on a nature walk last weekend and found a bunch of acorns and other various nuts. I spray painted them with glitter spray.  I'll use these as vase filler or something. I thought they came out pretty nice and it was a fun little adventure for her as well.


Well wish me luck on my shopping tomorrow. I'll let you know if I can find something exciting for that mantel!


Nov 6, 2013

A Thanksgiving Card

Well I have started the task of getting ready for Thanksgiving.  Cards are done and I am working on decor and a menu for the big day.  Pinterest is such a great tool for planning anything.  How did we ever get along without it!??
I went to a small crop this weekend and just took a bunch of the same fall image to create my cards. I colored them all the same and then just found scrap paper to make the card, so they are all different in one way or another. I like doing large batches of cards this way.  It helps me get rid of some of my scrap paper and it also keeps me from getting bored of making the same exact card over and over.

This image was a freebie from I Like Markers, which is a great blog for anyone who likes to use Copic Markers.  I used some Martha Stewart glitter on the pumpkins and leaves and I also used a glaze pen on the apples.   


 I am entering this card into the RCC87 Ribbon Carousel Blog, Holidays and Celebrations challenge.  Visit their blog HERE


Oct 31, 2013

A Birthday Card

Today I wanted to share a card that I made for my Niece for her birthday.  It is a digital image from Sweet Pea Stamps and the image is called Spring Nocturne. 

I colored the image with my Copic markers and then cut it out and used a gold stamp pad to apply gold to the edges of the image.  For the background paper I used Tim Holtz distress pads and applied the ink with my  ink blending tool.  Then I dropped little droplets of water on top of the ink to create an aged look.  When I stamped my images onto the background, I stamped them on a scrap piece of paper and then stamped them on my card without re-inking so that the image would be "faded" and give a more vintage appearance.


Oct 28, 2013

Quick and Easy Halloween Treat Bag

Life has been a little crazy lately........... crazier than normal that is.  My son came in from Oregon and visited us for a while and we threw a party last weekend so friends and family could visit with him.  Our large Chest Freezer quit on us.  Ahhh.  That was frustrating.  We probably had $60 worth of food, so not much really had to be thrown away but I still  hate that!  I know it could have been much worse so I'm not too upset.

My Niece and her husband just came in from London so we visited with them yesterday.  It was good to visit with them.

With all of these different things going I just realized that Halloween is this week.  Am I ready??  NO!! Since we don't get trick-or-treaters I make gift bags for my grand babies.  This year I kept it simple and quick (um ya know, since I spaced it off until the last minute).  I bought these little orange bags from Wal-Mart for cheap and then cut some spiders out with my Cricut to use as a gift tag.  I used  the October 31st cartridge.  I applied some green Stickles for their eyes, wrote their names on the body of the spider and hung them on their bags.  Boom! Halloween bags done.

Oct 25, 2013

A Mermaid Card

My granddaughter recently had a mermaid birthday party.  I had a digital image from  Mo's Digital Pencil.com.  This image is called Melia on Her Shell Phone.

I use images from this site a lot.  For some reason I am really drawn to these images.  I used some brown flock as sand at the bottom of the card.  I had purchased a variety package of flowers on Peachy Cheap a while back that included some small little flowers that had sea shell centers.  I cut the flowers off of the sea shells and used the shells as embellishments on this card. If you haven't heard of Peachy Cheap  it is a daily deal site that offers a different deal every day.
as you can see I also used some liquid pearls by Ranger to embellish her top and bottoms ( um er tail I guess). 

Well I think she liked the card so success on my part.  

Have a great weekend. I hope you get to do something crafty!!


Oct 22, 2013

Knit a Honey Cowl

I have to start off with an apology for my post yesterday.  My video didn't work on the email you received but if you go to my actual blog you can watch it there. I don't know why it works on the blog but didn't come through on the feed.  I'll have to research it and give that video thing another try some day.

I really love to knit and crochet.  I don't usually have a lot of time for it and I'll be the first to admit that I don't have advanced skills but I can usually do afghans, scarves and such.  I am actually working on a chevron afghan right now and hope to get it done in the next couple of weeks. 

I wanted to share this Honey Cowl I recently knitted.  It was a fun project, it turned out great and is so cozy and warm for those Wintery days that are headed our way.
This was a pretty easy project for anyone that has moderate knitting experience.  It is knitted on circular needles.  The pattern is FREE on Ravelry.com  and creates a dense warm cowl.  I made the longer version shown on the pattern and used Manos Maxima Merino Wool purchased from Urban Arts and Crafts store in color M2552 for the cowl pictured above. I hope you make one either for yourself or as a gift.  Please let me know if you have any questions.

Oct 21, 2013

Tutorial on making a paper rosette


I use a very simple technique for making paper rosettes.  I use them all of the time. Its a great way to use up little scraps of paper.  It's also a great way to create an embellishment that matches your card - or page for basically no extra money.  Once you have made the rosette, it can be sprayed with a medium such as Glimmer Mist, glittered, or you can use a stamp pad to darken the edges and so on and so on.

I was playing around with video on my Ipad the other day.  I made this tutorial in a video format and it is my first time at doing so, so cut me some slack!  I do think it explains the process pretty easily but if you have questions just leave a comment and I will be glad to help.  I have also posted an example of a card that I used a rosette on. You can also look back at previous posts to see other examples of how I have used them in the past.


Sep 6, 2013

My attempt at a Slider Card

So I've seen a few slider cards lately and thought that I would like to give it a try.


 So I tried.... and I tried..........and I tried!  Lets just say it took me SEVERAL attempts.  It's a good thing I have a lot of patience!  I took photos during DIFFERENT stages, on DIFFERENT cards so you might notice that some of the papers in the tutorial are different than the paper on the finished product ha ha (I can laugh about it now).  However.......... Once I got the system figured out it really isn't too bad. 
I thought I would give you the method I used to create the card. If you decide to attempt one of these maybe it won't take you as many times to get it right :).
First let me give credit where credit is due:
.  The bee images are a digi stamp I got from the blog Cre8tive Hands.  This is an awesome site that has freebies all the time.  The cloud digi stamp was from True D Doodle. The paper was from K&Company. I used Copic markers to color the images and I used a little bit of Liquid Pearls on the bee images.  You might also notice that I used some vellum and paper pieced the wings. Paper Piecing was covered in a post back in March of 2012.  You can refer to that post if you want to know more about that technique. 

To make this card I followed these steps:
  1. I printed, inked and matted my images
  2. I used a 6x6 paper because I found that I needed more room for the slider.  This may not be the case for you if you use a smaller image. 


  • After you have the front of your card assembled you are ready to make the slider.  It will need to be shorter than the width of the card and it will need to be narrow enough so that it doesn't rub against the top of the card.  If the slider is right up next to the top of the card it will not slide back and forth as well. Each card will vary but just play around with it to make sure your message can be seen and that it still has room to slide back into the card.
  • Once the area is determined, cut a notch in your card. This is the scary part. You need to make sure the notch isn't too long or your image (in my case it was the clouds and bee) won't conceal it but long enough to allow your message to pull out. I outlined in pencil the area to be cut and tested it before cutting it out. I believe they have a punch to make this cut for you but I used an  Xacto knife and thought it worked fine.
  • once this is done, use a circle punch to punch a notch out of the left side of your card, where the slider will be held.
  • flip the card over and use adhesive around all four edges, leaving a gap where the slider will be.  It is important to get this adhesive right on the edge.  You will then glue a 6x6 piece of white paper to the back of your card which will enclose and hide the slider.
  • attach the slider image to the slider itself.  I used a pop dot.  The pop dot will also act as a "bumper" so to speak.  It will keep the image within the slit that you cut into your card and will keep it from sliding under it.

  • \
  • Well I hope this is helpful and not too confusing.  If you have any questions, place them in the comments section and I will get back to ya!


Aug 11, 2013

Mini Dirt Cakes

Goodbye Summer!  Well school starts Wednesday.  It's hard to believe the summer is gone.  It flew by.  We didn't get to do half of the things I had planned in my head!  However that seems to be a common occurrence.  That head of mine has all kinds of things bouncing around in there.  LOL! I invited my cousin to bring her little ones last week so we could have an "end of summer" party.  Woo Hoo!  I have enjoyed my time with the grandbabies this summer but I am ready for the school year to begin so I can have a few hours of free time during the day and get some projects done around here.   (we'll see how many ACTUALLY get done) ha!

We had a great time at the lunch.  I fixed taco's which were good but the big hit of the party were these little individual "dirt cakes".  When I was younger we used to make these in a large terra cotta pot and put a bouquet of fake flowers in it. I decided to make individual ones for the kids because I think its kinda neat to get your own and it also helps serve as a great portion control so the kids don't get too much sugar.   I used small jelly jars as the serving dishes.  The girls got flowers in their dirt and my grandson got gummy worms in his.  I thought they would have been adorable with little "plant markers" or garden signs that had their names on them but I didn't get that part done.


If you are interested in making these I put the recipe below.  Just a word of warning - this recipe makes quite a bit.  I cut the recipe in half to make 5 small deserts and still had a good size bowl of pudding leftover.

Dirt Cake
1 lg. pkg oreo cookies
1 8oz pkg. cream cheese
1/2 stick of butter
1 Cup powdered sugar
2 small packages of instant vanilla pudding
3 1/2 Cups milk
12oz. Coolwhip

In a food processor crush the Oreo cookies until they are fine and crumbly. These will be the "dirt" Set this bowl aside until ready to assemble the dessert. 

In a small bowl combine the softened cream cheese and butter with the powdered sugar. Set this bowl aside as well.  In another larger bowl combine the instant pudding with the milk. Continue to beat this mixture just as you would when making pudding.  Once thickened, fold in the whipped topping. 
Combine the pudding mixture with the cream cheese mixture.

Layer the pudding mixture with the crumbled cookies. Make sure you end with the cookie layer or "dirt"  on top.  Once layered in your flower pot or serving bowl place in the refrigerator until ready to serve.  You can add flowers or gummy worms if desired.

I hope you enjoy this yummy and fun dessert. 


May 25, 2013

Change is Good- A Handprint Tree and Graduation

My blog is getting a re-do. Please be patient and excuse the mess!  There have been some recent changes in my life and I wanted them to be reflected in my blog. 

Change No. 1- After 30 years in the work force, I lost my job as a result of a company merger. 
Change No. 2- I decided NOT to look for work but to be a Granny Nanny to my grandkids.
Change No. 3- I decided to blog about more than crafts. Jerri's Craftroom gets a new name.

When my grandmother was alive she would say "a bushel and a peck and a hug around the neck!"  I have decided to call my blog  " a bushel and a hug" in memory of her. 

I am settling into my new position nicely. The grandkids are out of school and I am looking forward to a fun and crazy summer.  In the future I hope to have a little more time to blog and a wider variety of content. I will still have paper crafts but plan more kids crafts as well.  I would also like to share bits and pieces of information I think you might find helpful.

For Mothers Day the kids and I made their mom a tree with their handprints. I thought it came out really nice so I thought I would share. 
I bought an art board and used latex paint.  I painted my grandson's hand and arm in the brown and helped him stamp it onto the art board to use as the tree trunk and branches.  I had both grandkids use their finger and thumb prints to make the leaves for the tree.  I framed it and had them write the date in the bottom corner.  Pretty cute don't ya think!

We had a big preschool graduation.  The hats came in the wrong size and were way too big for the kids.  Oh well when you're this cute it doesn't matter.

Life is short so I think I've made the best decision of my life.  One look at this cutie and you just know I have the best job in the world!


Feb 20, 2013

Old Man Winter

Well I guess Old Man Winter wanted to go out with a bangIt looks like we are going to get hit with 6-10 inches of snow tonight and tomorrow.  I am excited because I love snow but I do worry about my family that has to get out and drive on these snowy days.

I think I will try to bake cookies tomorrow. I love to cook and bake on days when it snows or rains.    I will probably make the newest recipe I found for peanut butter cookies.  They are AMAZING!  I found the recipe on Allrecipes.com and it is really good and take only a few ingredients.
  
Peanut Butter Kiss Cookies Recipe

I don't have the Hershey Kisses on hand so I think I will give this a try with chocolate chips. Here is the recipe:

1 Cup of Peanut butter (I used creamy but I think either would be good)
1 egg
1 Cup of Sugar
Hershey Kisses
 Bake at 350 degrees for 10 - 11 minutes. Don't overcook and they will be yummy and chewy.
That's it!  I used my medium scoop and it made about 13 cookies.  I cooked them for 10 minutes.

When I made my cookies I divided my sugar into three different kinds per the advice I saw from a reader on the Allrecipes website.  So for the single recipe instead of the 1 Cup of white sugar I used
 ( 1/3 cup White Sugar, 1/3 cup of brown sugar and 1/3 cup of powdered sugar. )  and they were super yummy. I think this is awesome because there is no flour, no butter or oil just the three ingredients plus whatever chocolate you choose to use.
I really hope you try these because I think you will enjoy them.

This is a card using a digi stamp from Wee Stamps. You can find her images HERE.  This pretty little fairy is called Silver Fairy.  She is so cute. This is my first attempt at coloring this image and I can't wait to color her again.


 The little rosettes that are in the upper left had corner are super easy to make. I will try to put together a tutorial on how they are made in my next posting.

I hope you have a great snow day tomorrow and stay safe.

Jerri