Apr 30, 2015

Nesting Bird Card-Technique Junkies

Happy Thursday!

Before I get to my card I want to make sure and remind everyone of the Blog Hop we are having over at  Technique Junkies tomorrow.  Make sure you stop by to see all of the new release stamps for May and also get some great inspiration from our design team.

Today I am sharing a card I created for the TECHNIQUE JUNKIES DESIGN TEAM using a stamp called Nesting Bird. If you would like to see a tutorial on how to make these rosette's see my video at the bottom of the post.

Here's how I made the card:
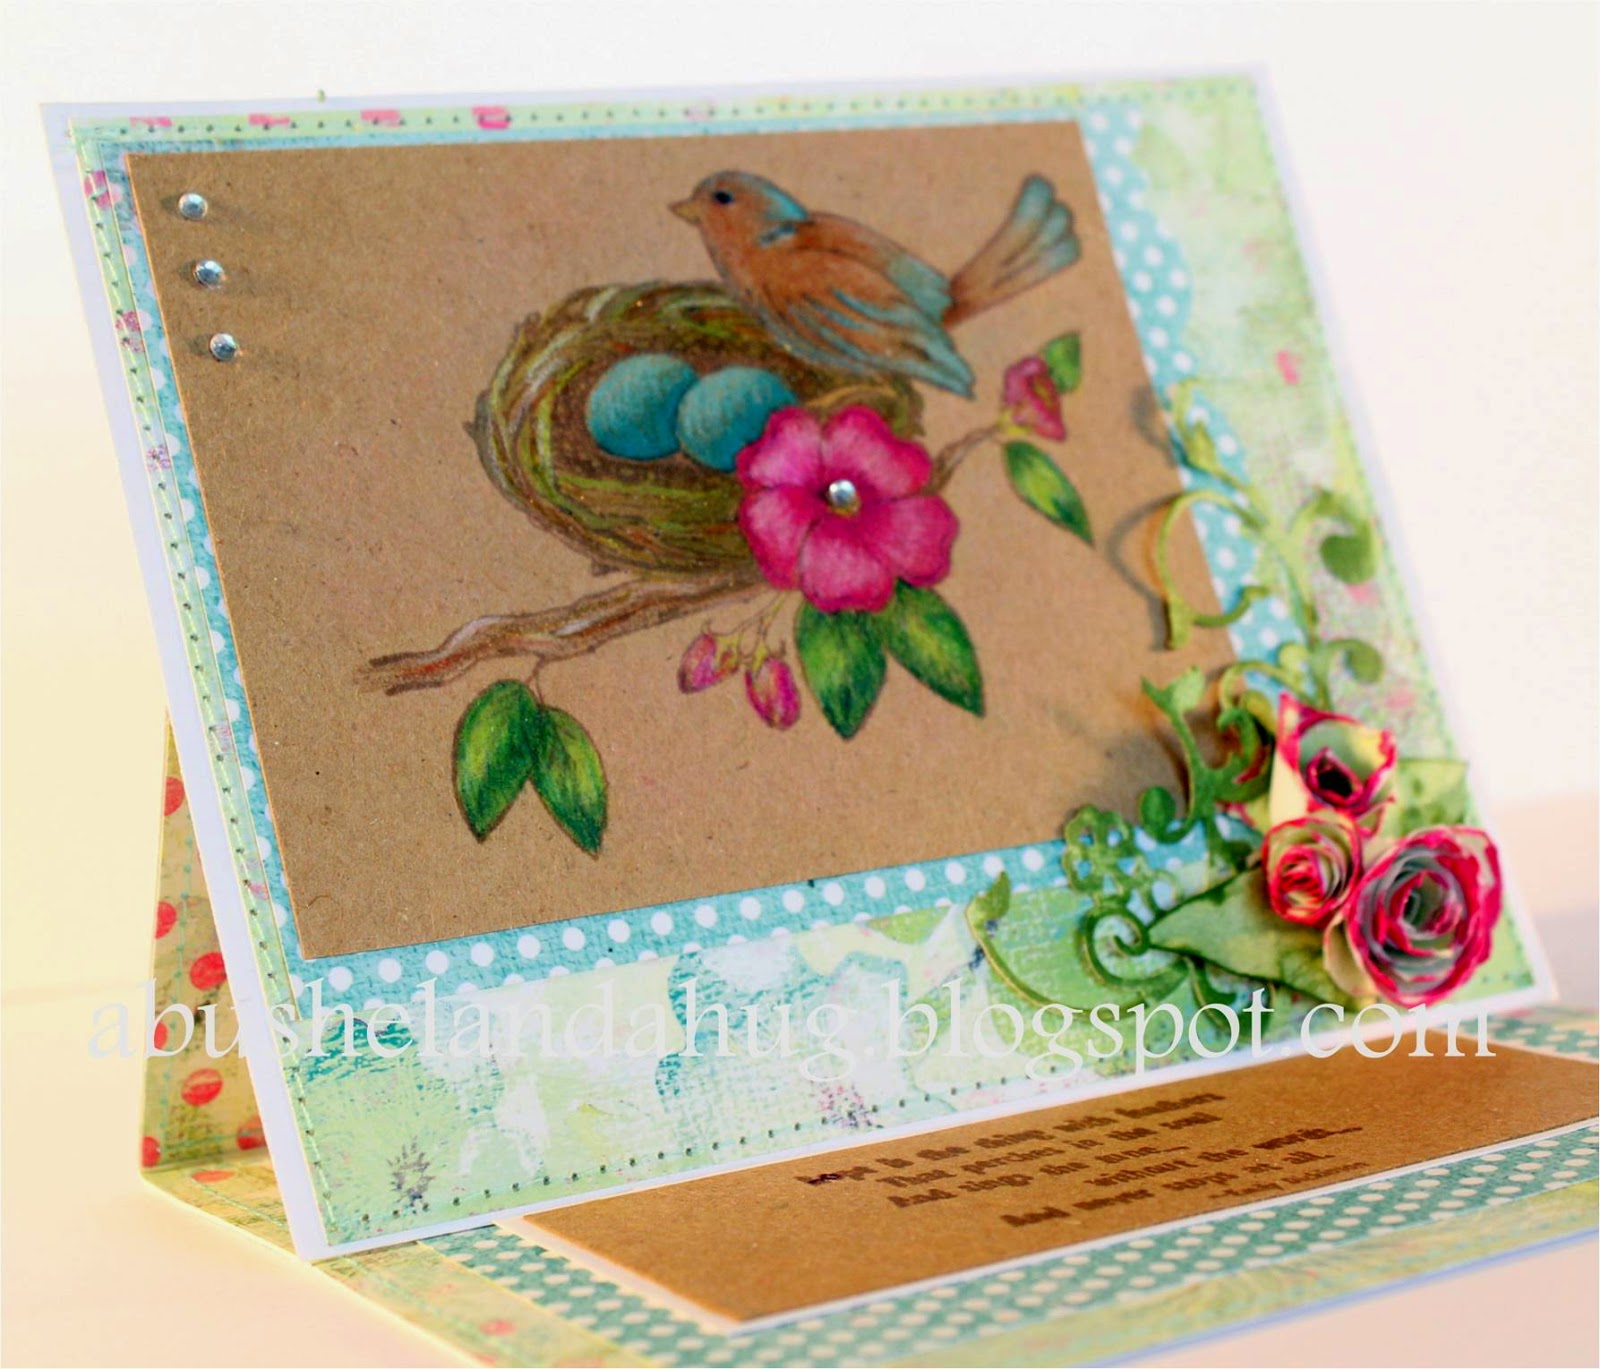
I stamped the image on Kraft paper in Memento Cocoa Brown ink.  I colored a base color in Copic Markers and then used my colored pencils to actually make the color pop against the Kraft paper.  For the base of the easel card, I used a sentiment stamp from Technique Junkies called Hope is The Thing which is a beautiful quote from Emily Dickerson.

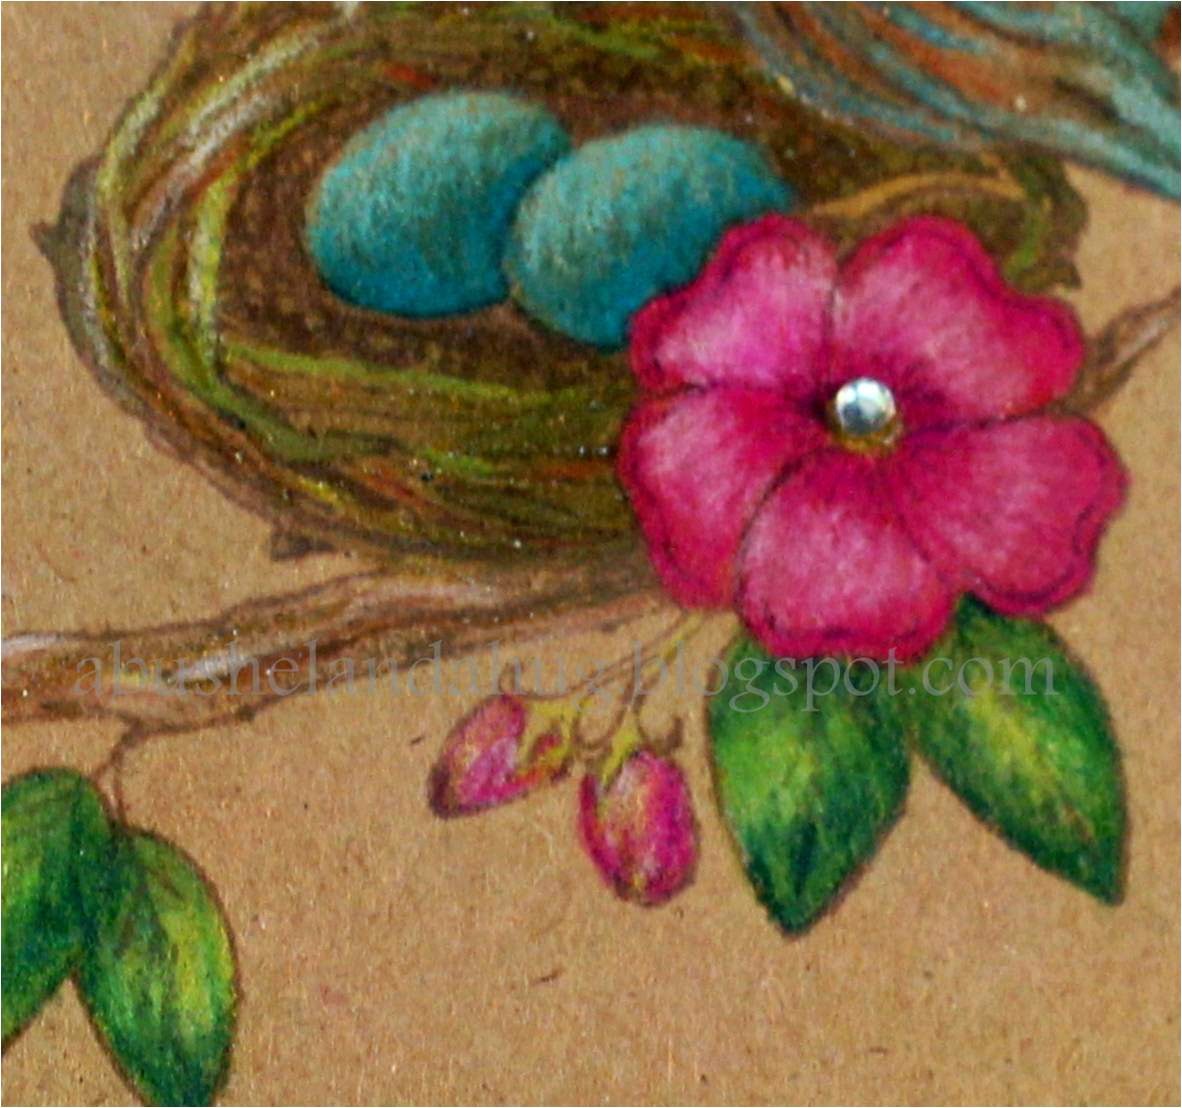
 I used a gold Copic Spica pen on the birds nest and on the tree branch.  I love the thin line the Copic Spica pen produces. I will be honest and say I have had some problems with the Spica pens in the past. I have a love-hate relationship with them.  They are awesome when they work, and when they won't work I am BEYOND frustrated (if you know what I mean).

I tried to zoom so you could get an idea of the detail the Spica pen provided on the nest and the branch. It doesn't show quite like it does in real life but I think you can see some of the small strands I added.

I made some little rosette flowers and colored the edges with my Copic markers and with a clear Wink of Stella.  If you want directions to make these rosette's you can view my YouTube video below.


Well I think that's about it for today. Don't forget to check in at Technique Junkies tomorrow for the  Blog Hop!
Have a wonderful day
Jerri

Apr 28, 2015

A Quick Card- Just Because!

Happy Tuesday Everyone!
Wow the sun is shining here and it's a beautiful day.  From what I hear it is supposed to only get prettier this week. I think Spring has finally arrived.

Today I thought I would share a quick card I made..... just because.  I didn't make it for any specific reason other than the fact that I ran across this stamp the other day.  I have had this stamp set FOREVAH!... (like years)... shhhhh.  I seem to accumulate things and then forget about them. In my craft room any way.  Do you do that?  Any way I ran into this cute little stamp set and it seems so "Springy" just like the beautiful day we're having in Missouri. I wanted to see what it looked like colored up so here you go....
It's a pretty cute little stamp set.  I just did a quick little card with nothing fancy, just some basic coloring with my Copics. First I stamped the card in black and then used clear embossing powder which made for quick and easy coloring.  I usually do it this way, rather than using black embossing powder.  You may be neater than I am, I tend to make a mess with the black.  Also I feel safer using the clear powder with my Copics. I believe I was told that the black would smear.  I also used my chalks and made a little sky background and just cut out some grass by hand and then pop dotted it on there to give it dimension.  You know I LOVE my pop dots!

This cute set is from Hero Arts, but as I said before it's pretty old. I'm not sure if it's even available any more. I think it's pretty darn cute. I would love to say I will try to color it up again using Fall colors, but the chances of me remembering to do are slim to done. I'm not gonna make any promises!
Well that's about it for now.  I'll be back on Thursday with a post for Technique Junkies.  
See ya then! 


Apr 20, 2015

Bridal Shower Card

Happy Monday
Today I am sharing a bridal shower card I created using an Uptown stamp called Uptown Couple Brett and Brenda Get Married.  I actually love all up the Uptown Stamps and have admired them for a long time.  I only have two of their stamps but hope to get more real soon.  They are ADORABLE!


This stamp actually comes with a "congratulations"sentiment, which I would have loved to have put on the front but I misplaced it somewhere.  You know how frustrating it is to misplace something. I looked EVERYWHERE with no luck.  I'm sure it will show up one of these days.
Copics used:
Skin: YR0000, YR000, R01, RV21
Hair: E29, E25, E31, E50
Suit: C9, C7, C5
Flowers R81, R83, R85, G24, G21

I used Stickles Rock Candy on her gown for some added sparkle.

Have a great day!

Jerri


Apr 18, 2015

Tiddly Inks Design Team Call

Happy Saturday!
Well it has been a rainy day here in Missouri and I've been a little under the weather.  Since I'm not one to sit still for long, I used this opportunity to create a card for the Tiddly Ink's Design Team Call.
Click on the link if you're interested in trying for the team!

I used the Wrynn Berry Sweet Digital Stamp. She IS Berry Sweet for sure.  There are so many cute images at Tiddly Inks it was hard to choose just one.


I knew this image would be a hit with my granddaughter who happens to LOVE strawberries and who also happens to have a birthday coming up next month.  I made an Easel card (my favorite card to make).  If you would like directions on how to make an easel card you can find great step-by-step instructions HERE.

Copics used to color this Berry Sweet girl:
Skin-E21, YR000, YR0000, R01, R20
Hair-E29, E25, E31, E50
Strawberry-G20, G21, R0000, R21, R22, R24, R27, R29, R39
Pink Mushrooms-RV17, RV14, RV13, RV10, RV00
Gold Mushrooms-Y21, Y23, Y26
Leaves-YG00, G14
Dress-BG53, T3
Shoes E31, ,E30, E33, E35

If you have any questions on how I made the card, feel free to comment and I will get back you ya!  Have a great rest of your weekend and wish me luck on the Design Team Call.

Jerri


Apr 16, 2015

Graduation Gift Card Holder

Happy Thursday!
Today I am sharing a card that I designed for the Design Junkies.  If you haven't checked out their blog then do so. You will be inspired with new creations by the design team daily.

Graduation is around the corner.  Can you believe it?!  What I can't believe is that my niece is graduating. Sheesh I feel old. 
I created a card that would hold a gift card but would also give me space to write a nice message on the inside.    

I love this stamp!I also loved coloring it.  My colored pencils were feeling left out so I put them to good use on this card. Don't fret... if coloring isn't your thing I have another trick up my sleeve for using this stamp in another way on my next post.

 The Technique Junkies stamps I used on this card are Darling Blooms and congratulations from the Holidays-1-flourish-sentiments set-of-7.


Here's how I made my card.
  • Stamp the Darling Blooms using Versafine (black) and clear embossing powder.  
  • Heat your design with a heat tool to set the embossing.
  • Once the design is cool, color in the flowers using any colors you like.  I used Prismacolor pencils but you could use whatever method you prefer.
  • Cut out the colored image and stitch around the 3 straight edges with a sewing machine.
  • Put redline tape on the back of your colored image, but only on the three straight edges.  The 4th edge with be the open part of your pocket. Stick this to your cardfront.
  • Purchase or create a tag that has dimensions to fit inside the pocket you have created.  I used my Silhouette Cameo to make the tag shown.  
  • Embellish your tag by sewing around the edge if desired and putting a ribbon in the hole of the tag.
  • Stamp your Congratulations sentiment on white card stock and attach it to your card using a pop dot.
  • Attach any gift card to the tag using repositionable tape, then slide the tag into the pocket.
You can click on the links above to go directly to the stamps used on my card or go to Techniquejunkies.com to look at all of the wonderful stamps they have available.


I hope this inspires you to get a jump on your graduation cards. Have a great day.

Jerri


Apr 10, 2015

Meow Chicka Meow Meow!!

Look at this adorable stamp from Technique Junkies!


This cute kitty is a new April release stamp over at Techniquejunkies.com.  I photographed him at an angle on purpose, so you could see that there is some dimension to the card and actually two cats (one on top of the other). I'll explain why.... when I first laid eyes on this stamp I kinda felt like he was bobbin' his head and singing "meow chicka meow meow"  lol (I think I have issues) sooooo I put him on an Action Wobbler.  If you haven't heard of an Action Wobbler , it's like a spring that allows movement to any item you place on it. There is a flat piece on each side of the spring.   One side of the spring attaches to your card base and the other side of the spring attaches to an object, or in this case a stamped image that I had cut out.
 see how he wiggles!
I am sure you could find lots of ways to use this cute stamp but just in case  you want to make a card like mine, I have included step by step directions below. I tried to do a series of photo's to give you a tutorial on how to make this card but for some reason those pics's were lost. 
Sorry but an outline is the best I can do today. WAH wah


Items used in the making of this card:
Meow Chicka Meow Meow stamp from Technique Junkies
Wasted - a Palettini background stamp from Technique Junkies
White Cardstock 8 1/2 x 5 1/2
White Cardstock (same size as cat stamp)
Scrap paper or masking paper (same size as cat stamp)
Cuttlebug embossing folder
Pink Ink pad
Black Ink pad
Diamond Glaze (for eyes)
Action Wobbler
Copic Markers, colored pencils or any other marker you prefer.
Ribbon and Flower or embellishments of your choice.
Pencil
Scissors


  • Score the 8 1/2 x 5 1/2 cardstock at 4 1/4 on your Scorepal.  When folded on the scoreline you should have a card front that is 4 1/4 x 5 1/2 inches.
  • Lay the background stamp on the upper half of your card. Using a pencil, lightly mark at the bottom of the stamp. Set the background stamp aside for now.
  • Ink up your Meow Chicka Meow Meow Stamp using a black ink pad. Stamp the kitty on your card, making sure to position your stamp slightly to the right of the card and just above the  pencil line that you marked in step 3. 
  • Stamp the Meow Chicka Meow Meow Stamp again on your small piece of cardstock and then a third time on a scrap piece of paper or on a piece of masking paper.
  • Using scissors, cut out the cat stamped on the small piece of cardstock. Using markers or colored pencils, color in the eye's and nose.  Put Diamond Glaze on the eyes if desired, and then set this piece aside to dry.
  • place the stamped masking paper (or scrap paper) over the cat stamped image on your card. This will provide a mask so you don't get ink on your cat when stamping the background.
  • Ink your Wasted Palettini background stamp in Pink (or any color of your choice) and stamp it on your card front.  Stamping on the top half of your card (over the mask).
  • Remove the mask from the front of the card.
  • Using your embossing folder and Cuttlebug, emboss a design at the bottom of your card.
  • Glue the ribbon and embellishment to the card. The ribbon should be on top of the pencil mark, making sure it lies just below the cat stamped on the card.
  • Once Diamond Glaze is dry, use an Action Wobbler to adhere the cut out image directly on top of the cat already stamped on the front of the card. 


If you are interested in purchasing these stamps click HERE to get to the Technique Junkies website or if you click on the names of the stamp above it should direct you right to that stamp on their site.

If you have any questions please feel free to comment and I will get back with you.

Have a wonderful day!


Apr 6, 2015

Best Gift Card

Happy Monday!
Today I'm sharing a card I created for Technique Junkies using one of their April release stamps called BEST GIFT (#SD613).
I do believe that this sentiment is so true.  Sometimes just being there, is the best gift you can give a friend in need.  I wanted something subtle for this card and I think I achieved it.  I LOVE the way it turned out.

Here's how I made the card:  
The background was created with Tim Holtz Distress Stains in Dusty Concord; Spiced Marmalade; Faded Jeans; Barn Door; Brushed Pewter.  The technique used is called the Stained Resist Tutorial and can be found on the Artistic Effects CD available on the TJ Website .  The stamp used for the background is called PANSY (#SD295).  Once dry, I cut the paper into 3 panels which were then spaced apart and placed on the card front.

The sentiment stamp for the front of the card is BEST GIFT (#SD613). I stamped it in black on white card stock and cut it out using a Spellbinders die.I used Pop Dots to attach. Three pearls were placed in the bottom left corner of the card to balance it out.

Don't Forget!! all stamps are 15% off at Technique Junkies  You need to HURRY!  You only have two days left to take advantage of this amazing discount.

Have a fantastic day!
Jerri


Apr 1, 2015

Technique Junkies Blog Hop and New Release!!

Happy Wednesday and welcome to my blog.  If you're stopping by here for the first time, I would like to say "welcome" and I would also like to thank you for taking the time to check out my blog.  

Whether it's your first time or not.... you have picked a GREAT day to stop in.

 I was recently selected to be part of the Technique Junkies Design Team.  Today we are  hosting a Welcome Hop to share all of the exciting news with you!  There is a NEW SITE, NEW STAMPS and NEW DESIGNERS.  That's a whole lotta new going on!   Be sure not to miss any of the excitement!  If you  didn't start at the Technique Junkie Designer Blog  (http://techniquejunkies.blogspot.com) then you will want to click on the link.  You don't want to miss a thing!

I am so honored to be a part of this wonderfully talented team!  If you have been following along on the hop you should have just come from Gini's blog at Ginicagle.blogspot.com.  Didn't she do an awesome job! 

In celebration of all things new, Technique Junkies is running a SALE ! Stamps in the store are currently 15% off from April 1st  thru April 8th.   Click on the Stamp number below to get a direct link to the store. 

 Today I'm sharing two projects created using just a few of the awesome new stamps being released.  

Card #1- features TWO of the new release stamps. Margot's Flower (#MC003) 
&  Forever and a Day (#SD599) .  Wouldn't this be a great Mothers Day card! Actually it would be a perfect card for anyone you love.  

I used Copics to color the image. Here are the colors used:
Flower-R39, R35, R83, R81, RV000 and Y02 for the center.  
Stem-G28, G24, G21, G20. 
The colored image was cut out using a Cuttle Bug and Nestabilities Classic Ovals Large in white cardstock and then the Classic Scalloped Ovals Large in dark red cardstock.  I edged the white oval with a Krylon 18kt Gold Leafing Pen and then glued the two ovals together.  I stamped the sentiment on white cardstock and once again matted it with dark red cardstock.  
The base of the card- 4 1/4 x 5 1/2 white card stock.   I cut a piece of patterned paper (mine is from a DCWV Once Apon A Time paperstack) but any would do.  I made sure it was slightly smaller than the front of my card and glued it to the front.  Then using my sewing machine, I stitched completely around the edge of the card. 
Front of card- is white cardstock 4 1/4 x 5 1/2 turned in an up and down position. I covered the front of this piece just as I did on the base of the card. I embellished with ribbon and used POP DOTS to attach it to the base.  I also used POP DOTS to attach the stamped image and the sentiment.

CARD #2
 Features the newly released stamp Bird and Butterflies (#SD614).  I used a small sentiment stamp Always be There (#SDX050) at the bottom of the card.

I used Copics on this stamp as well.
Bird-RV11, RV10, RV00, RV000, E30, E31, E34, Y15 for the beak and legs.  
Butterflies-I used the same pinks as above and a little of  Y15 around the edges.
I cut out the stamp once I colored it and then chalked around the image.  I used my Wink of Stella to add a hint of glitter.
I stitched around this image as well but with dark brown thread.  
I stamped the sentiment at the bottom in Memento Rich Cocoa.
This card is a 6 X 6.  

Thanks for stopping by and leaving your thoughts in my comments section.  I love hearing what you have to say! And if you have any questions just let me know, I'll be glad to answer them.  

You are now ready for the next stop on our Welcome Hop---Sally Lynn MacDonald at Sallylynnmacdonald.com.   You're in for a treat because she is super talented and has created some real works of art.

If you get lost along the hop here is the complete line up:


Thanks for stopping by.  Have a great day.