Oct 12, 2017

Tiddly Inks 2:3 Challenge Entry

Happy Friday!  Another busy weekend ahead for me but luckily I've had time to create a couple of cards for the Tiddly Inks 2:3 Challenge.  
You can get the scoop over at their blog. Click HERE for more information.


Since we're almost halfway through the month of October (CAN YOU BELIEVE IT!), I've decided to use a couple of Halloween images for my entries into the contest.  The card above was made using Alison the Witch.  This was a really fun image to color.  Copic used to color this beauty were:
Skin:E000, E00, E21, R11
Hair: YR000, YR04, YR07, E15
Dress: W0, W1, W5, W7, W9
Purple Sleeves and Trim on Hat: R29, V09 (I started with Red and changed my mind).
Once the image was colored, I fussy cut her out to place on the background. I used craft foam underneath the image to pop her up above the background.

The background was created on watercolor paper. I just drew a rough sketch of witches cauldron and then colored it in using my watercolors.  I used a circle punch of paper as a guide to draw a moon and then colored it in  along with the sky and clouds using watercolors for this as well. I added highlights to the clouds using my white gel pen. The bubbles in the cauldron are just drops of Glossy Accents that I used to give it dimension.  I loved the way this little lady turned out.  I'll be entering this card into the "Anything Goes" portion of the challenge.


This cutie here is another fun witch to color.  This image is called Too Cute to Spook. She's a little sweetheart so I'm entering this card into the  Girly Girl portion of the challenge.
I chose to do her dress in a more purple hue instead of the warmer grey tones I used in the first card.  I think purple is a little more appropriate for a  Girly Girl  ha ha.

Copic used for this image are:
Skin: E000, E00, E21, R21
Hair, Shoes and Cat: C9,C7, C5, C3
Frog: YG05
Dress: BV25, BV23, BV000, darkened corners with N8
Broom: E27, Y26, Y15, Y11

I inked the background of this image with distress inks and a blending tool.  I used Tim Holtz Distress inks in Black Soot and Seedless Preserves. I went over the dress with Wink of Stella to make it shimmer and shine.

Thank you for visiting my blog today.  I'll see you soon with some more Halloween cards!
I hope you've been inspired to do something crafty, or perhaps to even enter the challenge above. Even if you don't want to enter the challenge get on over to the Tiddly Inks Blog and check out all of the entries for tons of crafty inspiration.

Thank you for visiting my blog! I try my best to give you accurate information. I am not affiliated with any of these companies nor did I receive compensation or free product for mentioning them. All products used and mentioned were personally purchased... except any digital stamps won through challenges, which were received from the company with no expectation. This blog is NOT sponsored, requested, or paid and I did it only because I wanted to. The information provided in this video is based on my own personal experience and opinion. I am not an expert nor do I work for these companies.
Have a great day!
Jerri


SaveSave

Oct 8, 2017

Birthday Gift Tag Using Copic Markers

I'm feeling a little like a super hero.  This weekend has been a crazy whirlwind.  I went out of town for a business trip, I went to a high school  football game, two volleyball games, a music show and a birthday party!  Somehow I found time to pull together a little tag for my granddaughters birthday gift.

This wasn't my best work and in hindsight, I would have done a few things differently but hey, I will chalk it up as a learning experience.  I usually need to practice coloring an image a couple of times before I'm happy but with everything else going on this weekend,  doing ANYTHING twice wasn't an option this weekend.

To be honest, I was going to do a card but I messed up on the background  and ended up cutting out the image.   Then I decided I would put this sweet image on a tag.  After I got everything glued down, I noticed I hadn't cut the area out between her legs.  OOPS!  Too late!

I have been wanting to do some video's and so I gave it a shot while coloring this image.  Lets just say the video was a learning experience as well.  Perhaps with time I can improve on the process.

You can click on the video below to watch it.

  The image used is a digital stamp from TiddlyInks, called Let Us Eat Cake.  I love her images. I purchased a few of her Halloween images just  few days ago. I'll be trying to feature a few of my Halloween cards on the blog soon.

Thank you for visiting my blog! I try my best to give you accurate information. I am not affiliated with any of these companies nor did I receive compensation or free product for mentioning them. All products used and mentioned were personally purchased... except any digital stamps won through challenges, which were received from the company with no expectation. This blog is NOT sponsored, requested, or paid and I did it only because I wanted to. The information provided in this video is based on my own personal experience and opinion. I am not an expert nor do I work for these companies.

Have an amazing day.
Jerri

Sep 24, 2017

Embossed Birthday Card with Distress Ink

I wrapped a gift for my daughter-in-law today in a beautiful paper that had pink flowers and some gold embossing on it.  I was immediately inspired to make a card with those same elements.  I knew I wouldn't be able to make a card that "matched" her wrapping paper exactly but by using the same elements it gives the impression that it matches.

I pulled out a stamp set that I've had for a very long time (sorry the packaging is gone and I'm not sure who made this one).  These are individual stamps that I used randomly all over the page.  A background stamp would be great for this technique as well.  

Here's how I put this card together:
  1.   Cut a piece of watercolor paper to the size card you are going to make.  I used 5 1/2 x 4 1/4.
  2.   Use an Anti Static powder on the paper generously.
  3.   Stamp your design on the card with Versamark Ink. 
  4.   Sprinkle Gold Embossing power over your stamped area.
  5.   Shake off excess embossing powder.
  6.   Heat card front until the powder has melted.
  7.   Use a large paintbrush and wet the entire card front with water.
  8.   Using your Distress ink and a brush, apply the ink to the card in random areas until you get the saturation and look that you like.  I used Tim Holtz distress inks in Vintage Photo and Picked Raspberry, but you could use any color of distress inks or watercolors.
  9. I trimmed my watercolor piece down just a tad on the top and side so that it would fit on an A2 card made from regular white cardstock.
  10.   I cut out a small flag by hand and stamped the birthday message on it and embossed it as well.
  11.   I put foam tape behind the message to apply it to the card giving the message dimension.
I was pretty happy with the way the card turned out.  I love it when a plan comes together!

I hope this card inspires you to try something new.

Have an amazing day!

Jerri

Thank you for visiting my blog! I try my best to give you accurate information. I am not affiliated with any of these companies nor did I receive compensation or free product for mentioning them. All products used and mentioned were personally purchased... except any digital stamps won through challenges, which were received from the company with no expectation. This blog is NOT sponsored, requested, or paid and I did it only because I wanted to. The information provided in this video is based on my own personal experience and opinion. I am not an expert nor do I work for these companies.

Sep 22, 2017

Love Angel

Hello!
Well what do you know, I found one more old file with Valentine cards I had made back in February for my granddaughters.  This should be the last old picture I pull out of my....... I think.  Isn't is crazy what you find when you work on organizing?!


I talked on my last blog post about backgrounds. This is another example that.  I stamped these on watercolor paper and then used my distress inks with water to create these cards.  I created highlights with my white pen but if I remember correctly the white highlight area on her dress was done with my white Prismacolor pencil.

This is a digital image from A Day for Daisies called Love Angel.  So many cute images on this blog 

Have an amazing Day!
Jerri

Thank you for visiting my blog! I try my best to give you accurate information. I am not affiliated with any of these companies nor did I receive compensation or free product for mentioning them. All products used and mentioned were personally purchased... except any digital stamps won through challenges, which were received from the company with no expectation. This blog is NOT sponsored, requested, or paid and I did it only because I wanted to. The information provided in this video is based on my own personal experience and opinion. I am not an expert nor do I work for these companies.

Sep 20, 2017

Fishing Days

Today I was clearing through some things and getting some of my pictures in order.  I came across a card I had made back in March for my sons birthday.

I wasn't really posting on my blog at the time and I had forgotten about it.  When I was making this card I was really trying to work on background techniques.


This cute guy is a digital stamp from Sassy Cheryl's.  I LOVE her images.  This is a really old image and I don't believe it's even available any more however if you are looking for a "fishing style" image she has many new one's to choose from.  
Because I found this card in the archives I don't have the Copic colors used to create it.  I can tell you that the boy was colored with copies and the background was done with chalks and colored pencils.  The little puddle was done with Copic and then I used my white gel pen to highlight it and then a little Glossy Accents on it to make it look wet.

I really like creating backgrounds on the card that the image is printed on.  I've been trying to build up my courage to do it more often.  I'm always afraid I am going to work forever coloring my image and then mess it up when I try to do the background.  And sometimes I do!
Sandy Allnock is a pro at creating backgrounds on her cards.  She has a great Youtube channel and blog with lots of information.  She has inspired me to try backgrounds more often.  I've been practicing!!

Have an Amazing day!
Jerri
Thank you for visiting my blog! I try my best to give you accurate information. I am not affiliated with any of these companies nor did I receive compensation or free product for mentioning them. All products used and mentioned were personally purchased... except any digital stamps won through challenges, which were received from the company with no expectation. This blog is NOT sponsored, requested, or paid and I did it only because I wanted to. The information provided in this video is based on my own personal experience and opinion. I am not an expert nor do I work for these companies.

Sep 17, 2017

Craft Room Re-do

I recently decided to move my craft room to a different room in my house.  This turned out to be quite a job.

I live in an earth contact, so two of the 4 bedrooms in our house are in the back part and have no windows.  My craft room used to be in one of those rooms.  It was a larger room room but lacked natural light.  You can see pictures of my old craft room space here.


I decided I wanted to turn the larger room (without windows) into a TV/play room for the grandkids, and move my craft room into the smaller room so I would have windows.   I do miss having more work area but haven't regretted the change because I LOVE the natural light.  It's been a challenge trying to find a way to get all my stuff in the smaller room.  After months of trying, I think I have come up with a solution that will be a winner.

I bought an old dresser off of a local "swap and shop".  I painted it with chalk paint and gave it some updated hardware.  Being almost 50 years old, its built with solid wood. As a bonus, two of the drawers have dividers, which is so nice for what I'm using it for.  I think it turned out great.  I am really happy with the outcome.

I though I would share some of the other areas in my room, since it's clean for the moment!

This is my desk where I do most of my marker work.  First I want to talk about the wine racks you see hanging on the wall.  I put all of my Copic markers in these and I love the way it looks and functions.  I saw the idea on Pinterest.  The pinner said she got her wine racks at Target but I couldn't find them there so I got these on Amazon. I think I would like them to be hung closer together but after moving things around several times, my husband was OVER IT, if you know what I mean lol.                                                                  I also updated my chair.  I used to have a stool but I got this chair for a steal at TJ Maxx.  It's comfortable, has the ability to roll,  and I like the way it looks.   

We moved the light from my old craft room into this new room.

The craft shelf was also moved.  Most of the storage containers on the shelf are made from repurposed items.  The pencils at the top of this shelf are in a container that a candle came in.  I am getting two more of these to make a matching set. When it sits on the shelf you don't see the label, but honestly the label doesn't bother me.


The glass jars are repurposed candle jars.  I know the jars on the bottom were purchased at Walmart.  I got them a long time ago so I'm not sure if they still have this style of jar.  Once the candle was gone, I just cleaned out the left over wax with very hot water then ran them through the dishwasher.  


In the picture below I repurposed a Target spice jar, Market Pantry brand.  I use these for smaller items like sequins, googly eyes etc.
My distress markers
are in a repurposed peanut can.  I painted it with gold spray paint and then measured and cut scrapbook paper to wrap around the can.

I bought this little galvanized tray at a flea market.  I've painted it to match my room.  I love the way it looks but quite honestly it doesn't really work. It's too long and takes up too much room on my table.  I think at some point, I am going to sell the tray or find a way to hang it on the wall and get something like this tiered stand from Kirklands to sit on my desk.  I just want to see how much I really need it since it's $50 and I'm on a budget.


Now last I thought I would show you my closet. It's only half as big as the one in my old craft room.   Its not pretty but it is organized.  Making this "pretty" will be another project for another day.

Thanks for letting me show off my latest work I've done here in my craft room.  I hope you've gotten some ideas, or inspiration.  
Have an amazing day.

Mar 27, 2017

DIY Body Butter


So yesterday I had a little spare time and I needed to make a batch of my favorite body butter so I decided to put together a series of pics and instructions on how I make MY DIY Body Butter.

This is MY favorite recipe.  There are tons of recipes on the web. You may have to try a few to find the one that you love, or make some tweaks.  but I encourage you to keep at it until you find the recipe you love. That's how I actually got this recipe, I started with one I got from a friend and made changes to fit my liking.

This is a wonderful moisturizing lotion.  It melts into an oil once it is applied to your body but soaks in rather nicely.   I like to use it before bed.  I started using this recipe last fall and this is the first winter in a looooong time that I haven't had cracked dry heals.

Here are the list of ingredients:
1/4 Cup Cocoa Butter
1/4 Cup Shea Butter
1/4 Cup Coconut Oil
1/4 Cup Almond Oil
10 Drops Vitamin E Oil
7-10 Drops Lavender Essential Oil ( I use Young Living)
7-10 Drops Frankincense Essential Oil (I use Young Living)
2 Tablespoons Corn Starch


Directions- First I create a double boiler by placing a metal bowl into a pan that has a little bit of water in it.  I make sure the water is not touching the bottom of the bowl once it is placed on top.  Bring the water to a boil to heat the bowl and place the ingredients above into the bowl (up to the Almond Oil).  Remove the pan from the heat and sit it aside to wait for your ingredients to melt slowly.  You do not want the temperature to get too hot.

Once all ingredients are melted remove the bowl and allow it to begin cooling.  Once the bottom of the bowl is cool to the touch, I usually place the bowl into the freezer for a few minutes to speed up the process.  Remove it from the freezer when it looks like this:


It will be just beginning to harden around the edges of the bowl.  At this point you will want to add the rest of the ingredients.  and mix them together.  I use either a hand mixer or a stand mixer.


I used a hand mixer for this batch.
once the ingredients have been combined place the bowl back into the freezer until the mixture is more solid but not so much that it has become hard.  At this point you will want to begin mixing.  This is where a stand mixer is nice because the more you mix, the fluffier it will become.  
mix......... mix................. mix until you get it nice and fluffy.   This will take a while.  Put it into a container that has a lid.  It will be a little soft at first because it is a little warm from all of the mixing but it will stiffen up once it has cooled back down to room temperature.   I like to put mine in a small glass container and give them as gifts but you can use anything you may have around the house too. I found this glass container at TJ Maxx for next to nothing.  I really hope you enjoy this as much as I do.  If you have any questions let me know!


Thank you for visiting my blog! I try my best to give you accurate information. I am not affiliated with any of these companies nor did I receive compensation or free product for mentioning them. All products used and mentioned were personally purchased... except any digital stamps won through challenges, which were received from the company with no expectation. This blog is NOT sponsored, requested, or paid and I did it only because I wanted to. The information provided in this video is based on my own personal experience and opinion. I am not an expert nor do I work for these companies.


Feb 26, 2017

Delicious Philly Cheese Steak--A Super Easy Weeknight Meal

TodayI want to share a Pinterest Success story. Yeah me!

I found a Crock Pot recipe for Philly Cheese Steak that is so delicious and so easy, I just had to write a quick post and share it.


Click on this link to find the recipe-  Mom on Time Out.  

My husband couldn't get enough. I mean it was "melt in your mouth" good.   We will definitely make this again and again.

I found some super thinly sliced round steak to use in this recipe which made it even easier.  After cooking in the crock pot, it was so tender and delicious. 

I strayed from the recipe just a tad ( which is pretty normal for me).  First of all, I poured the stock into the crockpot and realized it was chicken stock and not the beef stock that was called for, so I threw in a couple of beef bouillon cubes and hoped for the best. Second, I had forgotten to buy Provolone cheese so I used Monterey Jack.  Third, I decided to put some butter on the buns before placing the in the oven.

This would be a great week night recipe because it was so fast and easy.  I hope you give it a try!

Have an amazing day.
Jerri


Jan 15, 2017

Valentines

Well it has been a long time since I have posted on this blog!  I just don't find the time now that I work.  I was inside all weekend due to the impending ice storm.  I decided to put my time to good use and get some valentines done. I love to craft on rainy days.

I'll try to get most of the cards posted that I got done today. I'm being lazy and using my new iPhone to capture these images.  I know it's not quite the quality as when I use my camera with the proper lighting and all, but I am rarely here during daylight hours and I don't want to pull out my tent and lights etc.  I'm just going to make this work ha ha.

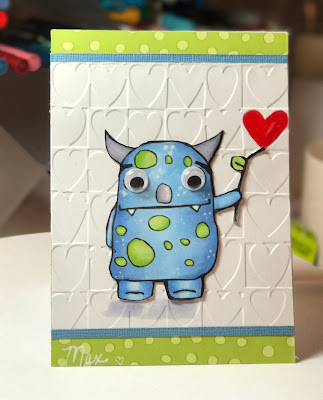
The first card I created is a digital image from the blog Fred She Said.
This is a pretty old image called Nolan's Monster.
The digital image is NOT a valentine.  It is just the monster, holding a stick with the leaf on it.  I try to think outside the box when I get ready to make a card.  I feel like I get more bang for my buck.

Here's how I made my card.  I used an embossing folder to create the heart background.  After I colored and cut out the monster, I positioned him on the card so that it looks like his stick is at the bottom of one of the background hearts.  I colored in that heart with my R27 Copic marker, I then added a bit of clear Wink of Stella and some Diamond Glaze on top of the heart to give it a shimmer, like a balloon.  I added some googly eyes to the monster to make him extra cute.  Copic colors used for the monster are:  B23, B21, B32, YG05, YG23 & YG25, BV20 & BV23.  I used my white Prismacolor pencil to highlight some of the areas and to add some little dots to the monster.  I think he turned out pretty cute! It's been a while since I've had to time to color, so I definitely feel out of practice but I hope you enjoyed what you saw here today. Maybe I'll have more time to craft in 2017. 

I appreciate you visiting my blog.  Let me know if you have any questions. I'd love to hear from you.  

 Thank you for visiting my blog! I try my best to give you accurate information. I am not affiliated with any of these companies nor did I receive compensation or free product for mentioning them. All products used and mentioned were personally purchased... except any digital stamps won through challenges, which were received from the company with no expectation. This blog is NOT sponsored, requested, or paid and I did it only because I wanted to. The information provided in this video is based on my own personal experience and opinion. I am not an expert nor do I work for these companies.
I hope you have an amazing day.