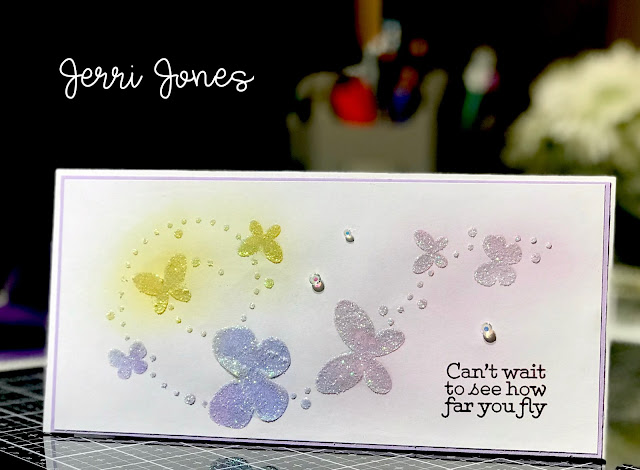
Today I am sharing three cards I created using the June Card Kit by Simon Says Stamp. I am in LOVE with this stamp set. The whole kit is really amazing. As soon as I saw this kit I had three people in mind that I wanted to make cards for.
I am going to list some basic directions on how I made my cards but you can also watch my video of how these cards were made by clicking on the link below.
The first card I started on, was for a beautiful young lady who is graduating. This pastel card is soft and feminine but also has a lot of sparkle. I started on this card first because I needed to allow time for the Glitter Gel to dry. This card was made using this Butterfly Stencil from Simon Says Stamp.
- First I taped down my card base and the stencil using some Washi tape. I like to use Neenah 80# Solar White Card Stock because it is Copic friendly, and any kind of Washi tape will work, or you can use blue or purple tape. I like to rub the tape on my hand or my shirt first to make sure it isn't too sticky. If it's too sticky it will damage your paper.
- I inked my butterflies using soft feminine colors but I think bright and bold would be beautiful too! I used a blending tool with a wooden handle to make this card but you could use whatever you have. The brushes work great but mine were dirty ha ha. I don't have a ton of inks but I have listed the ones I used below.
- After the inking was done, I removed the stencil so I could go over each butterfly lightly with the same color ink, creating a soft glow around each.
- I cleaned my stencil and then placed it back on my work in the same exact spot it had been originally. Using a craft knife, I spread a thin even coat of Gina K Glitz Glitter Gel over the stencil. The Washi tape was carefully removed and I then set my card front aside to let dry. Make sure you wash you stencil and craft knife right away.
- After the Gel was dry, I stamped the sentiment in Memento Luxe Elderberry ink and embossed using clear embossing powder.
- I placed some clear Nuvo gemstones on the card using liquid glue.
- The card front was matted with a piece of lavender card stock and then mounted on a card base made from Neenah 110# card stock.
- I trimmed my card down to a final size of 8 1/2 x 4.
My second and third cards are basically made the same however one was mounted on some patterned paper and was given some extra color around the butterflies, while the other was left clean and simple. Here are some of the steps I took to create these cards:
- I stamped my butterflies and sentiment on a piece of Neenah 80# card stock and then embossed them with clear embossing powder.
- I colored my butterflies using Copic markers. You can see how these were colored in the video above. Colors used were: Large Butterfly-R05, R22, R02 Small Butterfly-YG21, Y15 Butterfly Body-C5. I used R00 and Y00 to create the glow around each butterfly and then used a colorless blender to soften the edges.
- Once colored I mounted both card fronts on a piece of black card stock.
- One of my cards was finished at this point and so I placed it on a card base made from Neenah 110# card stock. The end card is roughly 4 1/2 x 5 inches.
- The other card was mounted on a piece of patterned paper before being placed on the card base and was therefore a little larger when finished.
I am not affiliated with any of these companies but I have listed some of the supplies that I used below for your convenience:
Beautiful Butterfly Stamp- https://www.simonsaysstamp.com/product/Simon-Says-Clear-Stamps-BEAUTIFUL-BUTTERFLIES-sss202086-sss202086?currency=USD
Altenew Rose Quartz- https://www.simonsaysstamp.com/product/Altenew-ROSE-PETAL-Mini-Cube-Crisp-Dye-Ink-Pad-Pack-AN332?currency=USD
Distress in Spun Sugar- https://www.simonsaysstamp.com/product/Tim-Holtz-Distress-Ink-Pad-SPUN-SUGAR-Ranger-TIM27164-21303?currency=USD
Distress in Shaded Lilac- https://www.simonsaysstamp.com/product/Tim-Holtz-Distress-Mini-Ink-Pad-SHADED-LILAC-Ranger-TDP40170-TDP40170RI?currency=USD
Altenew Sun Ray- https://www.simonsaysstamp.com/product/Altenew-SUNRAY-Crisp-Dye-Ink-Pad-ALT3086-alt3086?currency=USD
Gina K Ink-https://www.simonsaysstamp.com/product/Gina-K-Designs-OBSIDIAN-Amalgam-Ink-Pad-855-ggkd855
Gina K Connect Glue- https://www.simonsaysstamp.com/product/Gina-K-Designs-CONNECT-GLUE-Adhesive-gkd5614
Memento Luxe Elderberry Ink- https://www.amazon.com/Tsukineko-Memento-Mixed-Inkpad-Elderberry/dp/B00DV97AQ4
Sandy Allnock Hex Chart- https://art-classes.com/product/copic-hex-chart/
Copic Markers- I like to buy mine here: https://www.carpediemmarkers.com
Thank you for visiting my channel! I try my best to give you accurate information. I am not affiliated with any of these companies nor did I receive compensation or free product for mentioning them. All products used and mentioned were personally purchased... except any digital stamps won through challenges, which were received from the company with no expectation. This video was NOT sponsored, requested, or paid and I did it only because I wanted to. The information provided in this video is based on my own personal experience and opinion. I am not an expert nor do I work for these companies
Have an amazing day:
💗

