Dec 17, 2015

Countdown to Christmas

Well Christmas is almost here. I thought I would post one last Christmas card.

Today I used the stamp called Ornament from Technique Junkies.

I started by using a Cuttlebug folder to emboss the background of the card.  Next I stamped and embossed the ornament in white on a piece of purple cardstock.  I used a distress tool, to distress around the edges of the purple paper and then matted that on a piece of white cardstock and then again on a piece of silver metallic paper.  I used some craft foam to mount the ornament onto the background.

Well I hope you have enjoyed my card for the day.

Have a great rest of your week.

Jerri

Dec 10, 2015

Bee My Honey

Happy Thursday.  I had a wonderful, busy, crazy weekend.  I have most of my Christmas shopping done, which is a bit of a holiday miracle for me.  Just a few small gifts left to  get and I will be done.  I do have a lot of baking to do however. I'm hoping I can get that done in time.

Today I wanted to share the card I made for the Technique Junkies Design Team.


Today I used the stamp set called Bee Quotes.  I used the bee from the stamp and stamped it randomly all over the white piece and then embossed in black.  I chose the sentiment from the set Bee My Honey and embossed it in black as well. 
Have a Beautiful day!

Jerri


Nov 26, 2015

Let It Bee

Happy Thanksgiving!  I hope you have a wonderful day.  Today I will keep my post short so you can enjoy family and friends.

I have created another card for the Technique Junkies Design Blog. The card below was made using stamps from the set called Bee Quotes.

To make this card I first ran a piece of white card stock through my Cuttle Bug with the embossing folder called Honeycomb.  Then I ran a dotted turquoise paper through the Cuttle Bug using the same embossing folder.  I used the outline on the patterned paper as a guide and cut out about nine of the honeycomb shapes.  I randomly placed those on my white paper and glued them down.  Next I used the bee from the stamp set and stamped it on a piece of vellum using Archival Ink. I fussy cut the bee out and then put it on the yellow patterned paper and pop dotted that piece onto the card front.  Using one of the many quotes from this stamp, I stamped Let It Be and cut it out with a label die and placed it on the card. I chose a dark Turquoise Blue card stock to matt the card.

Have a Wonderful Day
Jerri

Nov 20, 2015

So Thankful

I recently celebrated a birthday, so today I thought I would share the thank you cards I created. I will give these cards to all of the awesome people who gave me birthday gifts.

I am a huge fan of using up my scrap paper. If you follow my blog you may remember several cards in the past that I have created with this purpose in mind. Today's card will be yet another idea on that subject!


I found papers in my stash that coordinated in color and just simply cut them in squares.  I think the size of these were 1 1/2 inches.  I placed the squares on my card front at an angle.


for the sentiment I found a stamp that I thought would be so fitting with the upcoming holiday.  

I hope you have enjoyed my card today.

Have an amazing day

Jerri

Nov 19, 2015

Sunflowers Card

I've been dying to try out a stamp from Technique Junkies called Sunflower Centers


This isn't a new stamp but it's the first time I've used it.  I tried to stamp this on red first but really loved the way it looked on the yellow. To make this card, I simply stamped the sunflower stamp in brown, on a piece of yellow card stock.  I used some watercolor pencils and just a tad bit of water on on a paintbrush, to brush streaks of reddish-brown on the petals of the flower.  Next I used my gold leaf pen to add some streaks of gold on the petals and to add specks of gold in the centers of the flowers too.  I mounted the stamped piece onto some craft foam and then onto a piece of green card stock.  This gives this card some dimension.  It's amazing how the craft foam makes a card look so much more finished and professional.  
To see how I use the craft foam, look back at my post on June 15th.


Well I hope this card inspires you to try a new stamp today.  If you're interested in the Sunflowers stamp shown above, click HERE.

Thank you for visiting my blog! I try my best to give you accurate information. I am not affiliated with any of these companies nor did I receive compensation or free product for mentioning them. All products used and mentioned were personally purchased... except any digital stamps won through challenges, which were received from the company with no expectation. This blog is NOT sponsored, requested, or paid and I did it only because I wanted to. The information provided in this video is based on my own personal experience and opinion. I am not an expert nor do I work for these companies.
Have an amazing day.
Jerri


Nov 12, 2015

Technique Junkies 30 Days of Christmas- Day 29

Day 29 already!!  I can't believe how fast the 30 days has gone.

This cards another simple idea for a quick Christmas card.  I feel like I have to apologize for the photography on this.  It gets dark now so darn early.  It's dark when I leave and it's dark when I get home lol.  Hard for me to get a good picture without some natural lighting.
This card was made by first embossing the background with a cricut embossing folder.  Next I stamped one of the images from  Trees Set of 6.  I embossed it with silver embossing powder. I matted the stamped image with some silver card stock and then I attached it to some craft foam before attaching it to the card front.
For the sentiment I stamped Merry Christmas and cut out the sentiment in a tag shape using my scissors.

Thank you for stopping by my blog. I hope your day is amazing!!!


Nov 9, 2015

A Baby Shower


so this weekend I hosted a baby shower for my niece.  It was a great time and she received so many nice things. I made a cake and then kept the smacks pretty simple.  I made some Rice Krispy Treats and dipped them in some Almond Bark that I tinted pink, veggie tray and a lot of the usual but I wanted to share one of the recipes I found o Pinterest (where else) I heart Pinterest.

 The Pin comes from a blog called Buns in My Oven.

This recipe was so super easy and oh so yummy.  You can click on the link above which will take you directly to the blog and get the recipe in a printable format but here are the basics.  

Roll out a tube of crescent rolls onto a workable surface. I sprinkled some flour on my work surface so it wouldn't stick.  In a bowl, mix together 2oz. of cream cheese, 2oz. of shredded swiss cheese, and 2 Tablespoons of Dijon mustard.  Spread this mixture on top of the crescent roll dough.  For the next layer, add pieces of deli ham.  Roll the dough up into a long log and then cut into slices.  Bake at 375 degrees until lightly brown. 
 Thank you Buns in My Oven for this great recipe. I will be making this again for sure.  Check out that blog there are TONS of great recipes there.

Make your day awesome!


Nov 5, 2015

Technique Junkies 30 Days of Christmas-Day 22

Happy Thursday!
Today I am posting a card for day 22 of our 30 Days of Christmas going on over the Technique Junkies Design Blog.  Before I get too involved in my card for the day, I wanted to remind everyone of the sale going on.  All November release stamps are still 15% off until November 8th.

Ok- back to Christmas.  Yikes. just saying that word is making me a little nervous.  I really need to get some things in gear to get organized for the holiday.   I know that if I get ahead of the game I will really enjoy the holiday's more.  I am hosting a baby shower for my niece on Sunday. Once that is done I will start on planning for my Thanksgiving dinner.

Today for my Day 22 card, I decided I wanted to make a card that looks antique.


I started by using Kraft paper.  I used a stamp called Vintage Music for the background.  Then on another piece of Kraft paper, I stamped the stamp called Ornament 1 in red and then cut it out to place in the bottom corner of the card.  I then stamped Merry Christmas, also in red and cut it out in a flag shape.  I used some of Tim Holtz Tea Dye and rubbed it around the edges to add to the vintage look.
You can't tell in the photo, but I used some Wink of Stella on the Ornament to give it some sparkle.

I matted this card with black and red to give it a finished look.

Thank you for stopping by my blog today.  Have an amazing day.

Jerri

Nov 1, 2015

November Blog Hop

Happy November. My goodness can you believe it's that time of year already!
Today the Design Team is showcasing all of the new release stamps from Technique Junkies.
Please join us in our BLOG HOP.  Stop by each blog and see what we've done with some of the new stamps.

If you're already following along on the hop, you should have just visited Jane Bosi's Blog. She does AMAZING work!  If you DIDN'T come from Jane's blog then you'll want to make sure you start at the beginning.  The Blog starts at the Technique Junkies Blog. Visit each site for tons of ideas and inspiration.  If you get lost along the way, I have listed the blogs in the order of the hop below.

When you get done being inspired, make sure to order your stamps right away because all of the  November release stamps are currently 15%. The discount will be visible when you check out at the site.


This new stamp is called Friends Indeed. I really used a mix of techniques for this card. I used some water color for her dress and on the dog and then I used some inking techniques for the floor and wall behind.  I think this is such a pretty stamp with the great antique feel that I love.

Don't forget to check out ALL of the new stamps at Technique Junkies and to take advantage of the sale- Take 15% off November Release stamps until November 8th.

Your next stop on the hop will be Judy Jackson.  She has a lot of talent and a great blog. Make sure you take a look.


Thanks for stopping by.  Have a FANTASTIC DAY.

Jerri


Oct 29, 2015

Technique Junkies 30 Days of Christmas- Day 15

Happy Thursday!
Well I hope you've managed to stop in and check out the 30 Days of Christmas going on over at the Technique Junkies Design Team. Today it's my turn!  


Christmas Trees Set of 6 is so versatile.  To make this tag, I began by using some of the Tim Holtz metallic stain. I smeared the stain all over the tag and then spritzed it with some water.  Once the tag was dry I stamped my trees.  I stamped the trees in the background on a piece of scrap paper first and then stamped again on the tag without re-inking. This gives a lighter stamp and for this purpose makes it seem as though there are trees in the background.  I used a stiff paint brush and some thinned down, white paint to spritz white spots all over the top.  I used a gray stamp pad to rub along the edges and a bow to finish it off.

Make sure you check out the Design Team Blog to get tons of Christmas inspiration.

Have a fantastic day
Jerri

Oct 22, 2015

Technique Junkies 30 Days of Christmas- Day 8

Happy Thursday
Today I am sharing a card I made using a stamp from Technique Junkies called Wood. I used this same stamp for my card last week.  This stamp is so versatile!

This card was inspired by a Christmas Decoration I saw.


I stamped the background stamp in once piece and then cut it into strips to resemble wood planks.  Once the strips were cut out, I ran the edges of the wood planks along a brown stamp pad to get rid of the raw white edges.  I made sure when I placed the wood planks that I turned them around and placed them outside of their normal order so that they would look like individual pieces.  I used a small brown marker tip to make nail heads on the wood planks.
I used my Silhouette to cut out the reindeer head in red.  When all done, I matted the whole thing on a piece of red cardstock.

Make sure you stop by the Technique Junkies Design Blog for more Christmas inspiration.

Have a wonderful day!

Jerri

Oct 15, 2015

Technique Junkies-30 Days of Christmas

Happy Thursday!
Starting today Technique Junkies is celebrating 30 Days of Christmas.  That's right, check in to the Technique Junkies Design Blog daily for 30 days of Christmas inspiration.
Today my card below is featured on the on the blog.

I am in LOVE with the new stamp called Wood.  I used it twice on this card.  First I stamped Wood on a piece of cardstock in green.  Once stamped,  I cut the stamped image into tree shapes.  I used a Sizzix die but of course you could use any die cutting machine. 
 Once I had the tree shapes cut out, I rubbed some brown on the edges to add some interest and give them the rustic feel I was going for.
Using the same Wood stamp,  I stamped the background in brown on a piece of lined cardstock.
I used texture paste along the bottom to create snow. Before the paste dried, I applied some glitter to give the card some sparkle.   
Once the snow was dry, I cut out a border in red polka dot and glued it to the edges of the card.  The trees were then added using pop dots.  
Thank you for stopping by my blog today. 

Have a Wonderful Day!
Jerri

Oct 8, 2015

You Are IncrediBALL!

Hello!
Hope you are having a great week.  It seems that October is now in full swing.  This past weekend was so cool it was the perfect setting for a bonfire.  We had the grandbabies out and we did just that.  It was a great time and I think they went home good and tired for their mom and dad.  

Today I'm sharing a card made with one of the October Release stamps from Technique Junkies.  Those October Release stamps are still on sale so take a look but HURRY because the sale ends tomorrow.

This stamps is called Incrediball Canning Jark and it comes as a set of two.  You get the jar and the sentiment.  I chose to give this card a farm house feel. I colored the jar with my Copic markers to look like water and a stem.  I cut out the jar and placed it on my plaid paper.  I pulled out my quilling stuff and created a flower and a leaf.  To finish off the piece I used some floss to tie around the jar.  I distressed the edges of the paper and then sewed around the edge with my sewing machine.  I thought this made a simple but charming card.

  Don't forget to check out the sale at Technique Junkies.  I hope you have a wonderful rest of your week.

Jerri

Oct 4, 2015

Moongirl and Owl

Today I'm sharing a little card I made for my Daughter-In-Law's birthday.

I love these Pinky Doll digital stamps.  I really enjoyed making this little cutie and see a few more I would like to color. I made this card while on my retreat with friends in Arkansas.  It had been a while since I had gotten my Copics out and really colored. I colored the entire image with Copics , except the background, which I did with my colored pencils. I added detail to the card with a few little flower shaped jewels and I put some some floral soft on the bushes.

Thanks for stopping by. Have a fantastic day!
Jerri  


Oct 1, 2015

Technique Junkies October Release & Blog Hop

Happy Thursday!  It's RELEASE DAY at Technique Junkies. All of the new October stamps are being revealed today.  The October Blog Hop is underway!  The Design team has been working on some amazing inspiration for these new stamps.  You will want to see it all so stop by each blog and see what we've done with some of the new stamps.

If you're already following along on the hop, you should have just visited Jane Bosi's Blog. She does AMAZING work! She is so talented and really knows her stuff when it comes to techniques.  If you DIDN'T come from Jane's blog then you'll want to make sure you do this right and start at the beginning.  The Blog starts at the Technique Junkies Blog. Visit each site for tons of ideas and inspiration.  If you get lost along the way, I have listed the blogs in the order of the hop below.

When you get done being inspired, make sure to order your stamps right away because all of the  October release stamps are currently 15% off through September 9th.  The discount will be visible when you check out at the site.

We've had some cool days and I just couldn't resist doing a fall card for you today.


This card was created using the new stamp called Negative Positive Tree.  I stamped the stamp twice (side by side) to create a long card.  I stamped the image in a dark brown to coordinate with the plaid paper used in the background.  I matted the stamped image on a piece of gold metallic.  Using a ton of colored markers, I colored in some of the leaves to add some interest.

Don't forget to check out ALL of the new stamps at Technique Junkies and to take advantage of the sale- Take 15% off all October  Release stamps this week. 


Your next stop on the hop will be Judy Jackson.  She has a lot of talent and a great blog. Make sure you take a look.


Thanks for stopping by.  Have a FANTASTIC DAY.

Jerri


Sep 24, 2015

Christmas Trees

Hey Hey we've made it through another week... almost.

I had a FABULOUS time with my friends last weekend at a scrapbooking retreat. I made a few cards and then I made a few scrapbook pages.  I hope to get them on my blog soon. I need to get them unpacked first though. I have been on a pretty fast paced run since I got home on Sunday.

Today I am sharing a card I made using one of the September release stamps from Technique Junkies Design Blog.

This card is made with the new stamp called Christmas Trees set of 6.  I used two of the trees from this set.  I stamped the trees in the background on a piece of scrap paper first before stamping them on my card to give the appearance that they were in the background.  I used some fine glitter for snow on the bottom of the card and also on the tree branches.  I LOVE the way this card turned out and it was really easy and quick to make.  I used Tim Holtz Peeled Paint stamp pad for the trees.  

I hope you have a great rest of your week.

Jerri

Sep 17, 2015

Happy Thursday!
Wow things have been really crazy around here.  I am getting ready to go on a scrapbooking retreat with some awesome amazing friends, but if I don't find time to pack I may just have to go and watch them scrapbook ha ha.  NO WAY!  I will find time to pack if it takes me all night.

The weather this past weekend was AMAZING.  A little bit of cool in the air makes me think of Autumn.  I have a personal rule about NOT getting out my Halloween stuff until the first of October but I am sure tempted to pull it out when the weather gets cool.

Check out my post on the Design Junkies Blog today.  I am sharing the card below.
I had a lot of fun the other day playing with this card.  I used an embossing folder to create the background.  I inked up the inside of the folder with some purple and a tad bit of orange Distress Stain from Tim Holtz.  I did this one some watercolor paper.  The technique can be found on the Emboss or Die CD.  Once the paper was dry I brushed my black inked across the top of the raised portion to add even more dimension.  I also rubbed some of the metallic stain on some areas.  And.... because I can't leave well enough alone sometimes, I also added some white to a couple of the raised areas using a white pen.  I wanted to make sure they popped against the purple background.

The featured stamp on this project is called Fright Night. I love this stamp and actually used it on my card last week as well.  I love it so much though that I thought it could be used alone.  I stamped it on a piece of white card stock and then cut it out with a Spellbinders die.  Once cut out, I rubbed some of the Tim Holtz Pumice Stone and some of the Tim Holtz Black Soot along the edges.

I hope you enjoyed my project today. Check out all of the awesome new stamps at the TJ Website.
Oh and Wish me luck on getting all my stuff packed.  Yeeesh..... I got a lot of stuff..

Have an awesome day!

Jerri

Sep 10, 2015

Fright Night!

Happy Thursday!
Well Halloween will be here before you know it.  Today I am sharing a card I made using TWO new stamps from Technique junkies.  These are from the new September release.

This card features the stamps,  Black Cat and Fright Night.  To make this card I inked up a piece of watercolor paper with oranges and reds and I used some black spatters on it as well.  When that piece was dry I inked up my Black Cat stamp with some Black Stazon Ink and stamped it on top of the inked up paper.  I trimmed down the piece and distressed the edges with a distress tool.  I matted this piece on top of some black patterned paper that I had cut slightly larger. This piece was also distressed on the edges.  Using some of the paper scraps from the watercolor paper that I trimmed down, I glued those strips below and then put my Fright Night sentiment on top of that.  I inked up the edges of the sentiment once it was stamped with my black stamp pad. around the card front itself, I used a sponge and applied some distress ink to give it an added layer of color because I didn't want it on a stark white card. I had a lot of fun playing with this card.  

Well thanks so much for stopping by my blog today.  I hope the rest of your day is just amazing.

Have a wonderful day
Jerri


Sep 3, 2015

Winter Wonderland

Happy Thursday!
Today I am sharing my card that I made for the Technique Junkies Design Blog today.
This card features another new Christmas stamp from Technique Junkies called Winter Wonderland.
I am a little unhappy with the quality of this picture because the card came out really cute in person.  I did this card in different layers. By stamping this several times, once in blue and twice in green, I was able to cut the pieces and layer them to create this card.
  1. Stamp the entire stamp in in blue and set aside.
  2. Stamp the entire stamp in green on two separate pieces of cardstock.  These pieces will be cut and then layered on top of the blue.
  3. On the first green card, cut along the snow line and glue it on top of the blue. This will give you a blue sky and green trees. You can use pop dots if you choose so that this piece sits a little higher.
  4. On the second green paper, cut out a few of the trees and then put them on top of the trees already on your card with pop dots to give them dimension. 
You could add some sparkle to the snow or to the trees. I left mine plain but I think the sparkle would be pretty too.

Don't forget to check out SALE going on at Technique Junkies until September 8th.  All new release stamps are currently 15% off.

Have a Wonderful Day!
Jerri

Sep 1, 2015

It's Beginning to Look a Lot Like Christmas!!

At Technique Junkies that is.  New Christmas and Halloween stamps are being released today at Technique Junkies.  You'll want to see all the inspiration from the Design Team so join us in our BLOG HOP.  Stop by each blog and see what we've done with some of the new stamps.

If you're already following along on the hop, you should have just visited Jane Bosi's Blog. She does AMAZING work! She is so talented and really knows her stuff when it comes to techniques.  If you DIDN'T come from Jane's blog then you'll want to make sure you do this right and start at the beginning.  The Blog starts at the Technique Junkies Blog. Visit each site for tons of ideas and inspiration.  If you get lost along the way, I have listed the blogs in the order of the hop below.

When you get done being inspired, make sure to order your stamps right away because all of the  September release stamps are currently 15% off through September 8th.  The discount will be visible when you check out at the site.

I created two Christmas cards for the hop today. I know what you're thinking but it will be here before you know it. Why not get those cards ready now before the craziness begins.

Both of my cards are a simple style but this one is a little more involved than the next one.  I like clean some may say boring style anyway, but when it comes to creating Christmas cards I really try to stick to this rule.  When making multiples of ANY card, simple is good. I learned this lesson the hard way.  To make this card:

  1. I created some waterpaint using my Tim Holtz Distress Pad.  I stamped the pad directly on my craft sheet and then spritzed the stamped are with some water.
  2. Next I used a paint brush with LONG bristles. A liner brush would be great.  I dipped the brush in the green watercolor and then dabbed it on my paper, making sure to use the side of the brush, creating long marks for the tree branch.
  3. Next I decided I wanted some texture so I mixed some texture paste into the remaining color left on my craft sheet and just applied some paste on top of the branch using my pallet knife.  
  4. I stamped the BEAUTIFUL new stamp Ornament 1 with Versamark Ink and then embossed it using Gold Embossing Powder.  This stamp has beautiful detail so a detail powder would be awesome but I didn't have any and mine turned out fine.  
  5. I placed small gemstones on the branches for sparkle.
  6. I matted this card with a deep red cardstock but dark green would also be beautiful.
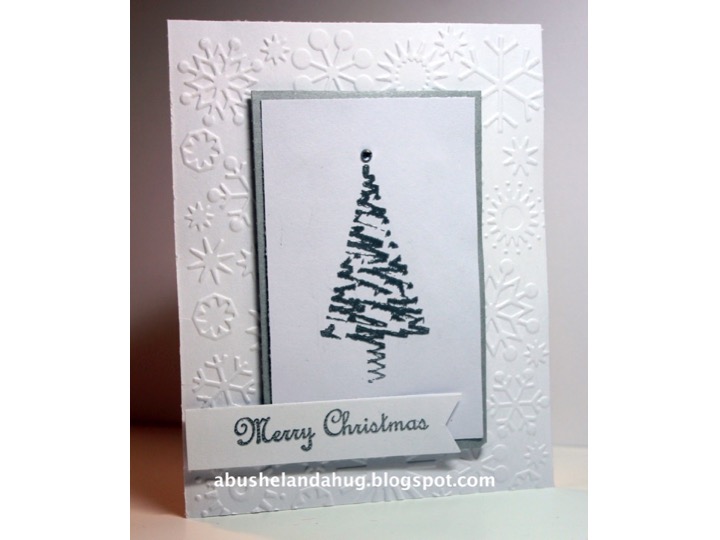
Card no. 2
This card is SUPER easy. You could whip a bunch of these out for your friends and family in no time.  This card features two of the new Christmas stamps.  The tree is from Christmas Trees Set of 6.  I LOVE LOVE this set. I simply colored directly on my stamp with my distress markers.  Once I had the areas colored in well, I put some warm breath on the stamp right before stamping to make sure the ink was good and moist.  The Merry Christmas sentiment is calledMerry Christmas 2.  I thought it stamped beautifully using this method.  I matted this card using a deep green cardstock but red would be pretty as well.  I couldn't decide if I wanted to add bling or not.  I finally decided no but I still have time to change my mind hee hee. You could use some of the craft foam between the card front and the colored card stock as well to add some dimension.  

Don't forget to check out ALL of the new stamps at Technique Junkies and to take advantage of the sale- Take 15% off all September Release stamps this week. 


Your next stop on the hop will be Judy Jackson.  She has a lot of talent and a great blog. Make sure you take a look.


Thanks for stopping by.  Have a FANTASTIC DAY.

Jerri


Aug 27, 2015

A Watercolor Card

Happy Thursday
Today I am sharing a card I made using a stamp by Technique Junkies.


I am using the Contemporary Floral stamp once again!  I just love it. This stamp seems to be my favorite from the stamps just released in August.  Although it would be hard to choose a favorite, I have certainly gone back to this one again and again. 

I used my Distress Inks to create a watercolor look on this card.  I stamped the image using an Archival ink and I made sure to stamp it on watercolor paper.  I actually used a Distress Marker for the flowers. To do this, just rub your marker on either a craft mat, or on an acrylic block.  Spritz the ink with water and then use it as you would watercolors.  I picked up the color with a paintbrush and painted in the petals.  For the background, I used a variety of distress inks in green and spritzed them with water.  I dabbed the green ink on the card with a larger paint brush.  Once dry, I added a darker green ink toward the center of the card.Once dry... again.....I matted the card and added some clear beads just for some interest.  I thought it turned out pretty. A little different from my normal style but that's what I was shooting for.  

I hope you enjoyed my card today. If you have any questions just let me know.

Have a Wonderful Day!


Aug 20, 2015

There Is Always Hope

Happy Thursday!

I hope everyone is enjoying their week.  Things have been busy busy around here.  I've been loving my new job, grandkids are starting their school activities, we've had several weddings to attend and as if I don't have anything else to do, I have started knitting a baby blanket.  Am I crazy or what?!  It's been a while since I knitted anything so I'm working kind of slow.  Geez, I hope I get it done before the baby gets here.  Wish me luck.

Here's a card I made for the Technique Junkies Blog using two of the August release stamps.


Here's how I made my card:

I stamped the background using Contemporary Floral Stamp #638.  I used a gray ink pad and randomly stamped around the edges of my card. I used only the top portion of the stamp since the bottom of the stamp is mostly stems.  For the Sentiment, I chose the new stamp called Always Hope #SD651. I stamped it on a piece of white cardstock. I cut the sentiment out with my Cuttlebug and a Spellbinders die.  I also cut a piece of purple cardstock with my same Spellbinders die just one size larger to layer behind the sentiment.  I rounded the corners of the card to finish it off.  This was super easy and quick.  

I hope you have a wonderful day.

Jerri


Aug 13, 2015

It Seems I Couldn't Love You More....

Happy Thursday!
Wow school started yesterday. Can you believe it?!  That always the first sign that summer is coming to an end. I cannot believe how time flies these days. We are all so busy I guess.
If your time is flying by and you would like another quick and easy card I think I have another one for ya.
Today I am sharing a card I made using a couple of stamps from Technique Junkies.
To make this card, I used the stamp Heart Strip #SD345.  I stamped the hearts onto a piece of patterned paper and then cut them out by hand and then set them aside.
I applied a watercolor technique using Tim Holtz dies on a piece of watercolor paper.  You can get complete instructions on how this technique,and many more are done on the Artistic Effects CD.  For this card, I wet my watercolor paper down with a spray bottle and dabbed the color on with a paint brush. I set it aside to let it dry.  You can reapply color to areas that need more color.
Once you have the watercolor effect looking the way you want, you're ready to make the card.  To make the card above, I stamped the lovely sentiment called I couldn't Love You More #SD409.  Next I applied the hearts I had previously cut out and then using a Copic Multi liner, I drew a free form line around the hearts.  I matted the whole thing on a piece of cardstock. 
I was very happy with the way this card turned out. It also gives you way to use the stamp a bit differently than just stamping it out.  


Have a Wonderful Day.   
Jerri


Aug 6, 2015

Technique Junkies-Pont Alexandre III

I posted this card on the Technique Junkies Design Blog today. This is a new release stamp called Pont Alexandre III.  If you love this stamp as much as I do, you may want to jump on over and purchase it while it is still on SALE-15% off until August 8th!
I wanted the watercolor look for this card. Here's how I made the card.
  1. I stamped the Pont Alexandre III on watercolor paper.  I chose the smoother side, although you can still see some of the texture from the paper in the stamp, which I like. I used the Ranger Archival Ink Pad in black.  You'll want to use an ink that is waterproof. 
  2. To make the cloud like shapes in the top right corner, I used gesso.  I just simply used my craft knife to make a couple of swipes on the top right of my card.  I kept it pretty thin so it would dry quickly.
  3. I used some of my blue and purple stains to color the majority of the card front.  I put some of the color on my craft sheet and then sprayed my card pretty well with water.  Using a paint brush, I dabbed the blue and purple color on my card. 
  4. Next, I did the same with yellow. I tried to keep the yellow around the lights and then I dabbed some along the street. I tried to make it appear as a reflection.
  5. To give the yellow a bit more PUNCH, I sprayed some yellow glimmer mist in the area next to the lights.  I wanted it to be considerably brighter in that area.
  6. For the sentiment, I chose a Technique Junkies stamp called Needed to Be. I stamped it on a piece of scrap watercolor paper that I had applied gesso to. I also had hints of watercolor on it. 
The card front and the sentiment were both matted with coordinating paper.

I hope you enjoyed my card project today. Don't forget to take advantage of the sale before it's over. 

Have an AWESOME day.

Jerri


Aug 1, 2015

It's A Technique Junkies Blog Hop Today

Happy August Junkies!
I have been without internet for several days.  AHHHHH!   I'm not kidding. I just don't function well without it.  But I've been working on this at my daughter's house, at my mother's house, at the doctor's office. pretty much wherever I can find some wifi.  So if it seems like I'm bouncing all over the place..... I AM. lol.

Today the new August stamps are being released at Technique Junkies.
Join us on our blog hop today so you can get a peek at some of the new stamps and get some inspiration along the way. ALL NEW STAMPS ARE ON SALE--15% off until August 8th so be sure to take advantage.

If you've already been following along on the hop, then you've just come from Jane Bosi's blog.  Wow! Doesn't she do an awesome job?!
If you are just now hearing about the hop, then you'll want to start from the beginning.  Click HERE so you don't miss out on anything. If you get lost, I have provided a list of the blog, in the order of the hop, below.

I've created two cards today using the same stamp.  I chose Contemporary Floral
For this card, I actually used two stamps.  The main stamp is the new August stamp called  Contemporary Floral.  After I stamped the image, I colored it with my copic markers and matted it on some black paper, and then again on some green patterned paper.  For the sentiment, I used the THANK YOU from the set of stamps called Simple Sentiments 2b.  I cut the stamp in half so I could divide the words and stack them on my punched out circle.

For this card I again chose the new August release stamp Contemporary Floral .  This time I used the stamp for both the main focal point and for the background.  First on the background, I stamped on a piece of white card stock using a grey stamp pad.  I stamped all around the edges of the cardstock, using mostly the top portion of the stamp.  Then I stamped the full stamp image on a smaller piece of white cardstock, this time in purple.  I matted the smaller piece with a dark purple piece of cardstock.  I used a piece of craft foam behind the matted image to make it pop above the background piece.  I've used the foam piece before, so if you have questions you can let me know, or refer back to some of my earlier cards.

Dont forget to check out all of the new stamps at Technique Junkies and to also take advantage of the sale that's going on until the 8th.

Next on the hop is Gini at   http://ginicagle.blogspot.com. She is AMAZINGLY talented.

Sally Lynn MacDonald  http://www.sallylynnmacdonald.com
Jerri Jones http://www.abushelandahug.blogspot.com  YOU ARE HERE

I hope you enjoy the hop and have a wonderful day.


Jerri


Jul 30, 2015

Floral Abandon by Technique Junkies

Happy Thursday.

Today I'm sharing a card I made using a couple of stamps from Technique Junkies.

This card was created using a stamp called Floral Abandon.


Here's how I made my card.
  1. I stamped this image on white card stock using a Versamark Ink Pad and used bright green embossing powder.  Once I had the image embossed with my heat tool, I cut it down to a strip that is approximately 1 3/4 in. x 4 3/4 in.  Once I cut out the strip, I matted it on a piece of black card stock cut slightly larger than the embossed piece.  
  2. I stamped the sentiment using another Technique Junkies stamp from a set called Simple Sentiments 2b. This set includes 13 sentiments.  I chose the Thank you stamp for my card. I cut the stamp in half because I wanted to stack the words on top of each other.  I stamped this and then cut it out in a square shape and matted it with the black cardstock just as I did in step 1. 
  3. I found this piece of patterned paper with black and white chevron in my scraps. I thought it would add some POP to the card so I cut a small strip and placed it along the bottom and slightly tucked one end behind my green piece.
  4. To finish up the card, I matted my card piece on a piece of green card stock and then I matted it again on a piece of black card stock.  I added three black gems and called it done!
Well that's it for today.  Be ready to join us at Technique Junkies for a Blog Hop on Saturday August 1st when we'll unveil the new release stamps for August.

Have a fantastic rest of your day!

Jerri